> ## Documentation Index
> Fetch the complete documentation index at: https://docs.go.aiinsurance.io/llms.txt
> Use this file to discover all available pages before exploring further.
# Form templates
> Build your form library: upload or create templates, edit them in the document editor, and insert smart tags that fill from entity data.
Form templates are the master documents your team [generates
forms](/app/features/forms) from — quote proposals, policy documents,
claim acknowledgements. The **Forms** tab of the admin area is the template
library: upload documents, create new ones from scratch, edit them in the
built-in document editor, and place **smart tags** that fill in entity data at
generation time. Open it by selecting your **company name** at the bottom of
the left sidebar, then the **Forms** tab.
The Forms tab is only visible to roles that can create forms — of the
standard roles: **Carrier Admin**, **Manager**, **Event Manager**, **Policy
Administrator**, and **UW/Ops Team Member**.
 ## Form categories
Every template belongs to a **category**, chosen when you create or upload it.
The category decides where the form can be generated and which entity's data
its smart tags draw from:
| Category | Generated on | Smart tags fill from |
| ------------------ | --------------------------------------------------------------------------------- | ---------------------------- |
| **Claim/Incident** | An event, via its Actions menu (see [Event actions](/app/features/event-actions)) | The claim or incident's data |
| **Quote** | The quote flow's Forms step (see [Quoting](/app/workflows/quoting)) | The quote's data |
| **Policy** | The quote flow's Forms step; the generated form carries onto the policy at bind | The quote/policy data |
Quote and Policy templates are also the ones [auto-added
forms](/app/admin/auto-added-forms) rules can reference. A template whose
category shows as **Unknown** has no data scope: it can't be generated against
an entity and the editor offers no smart tags — assign it a real category in
the editor.
## The template list
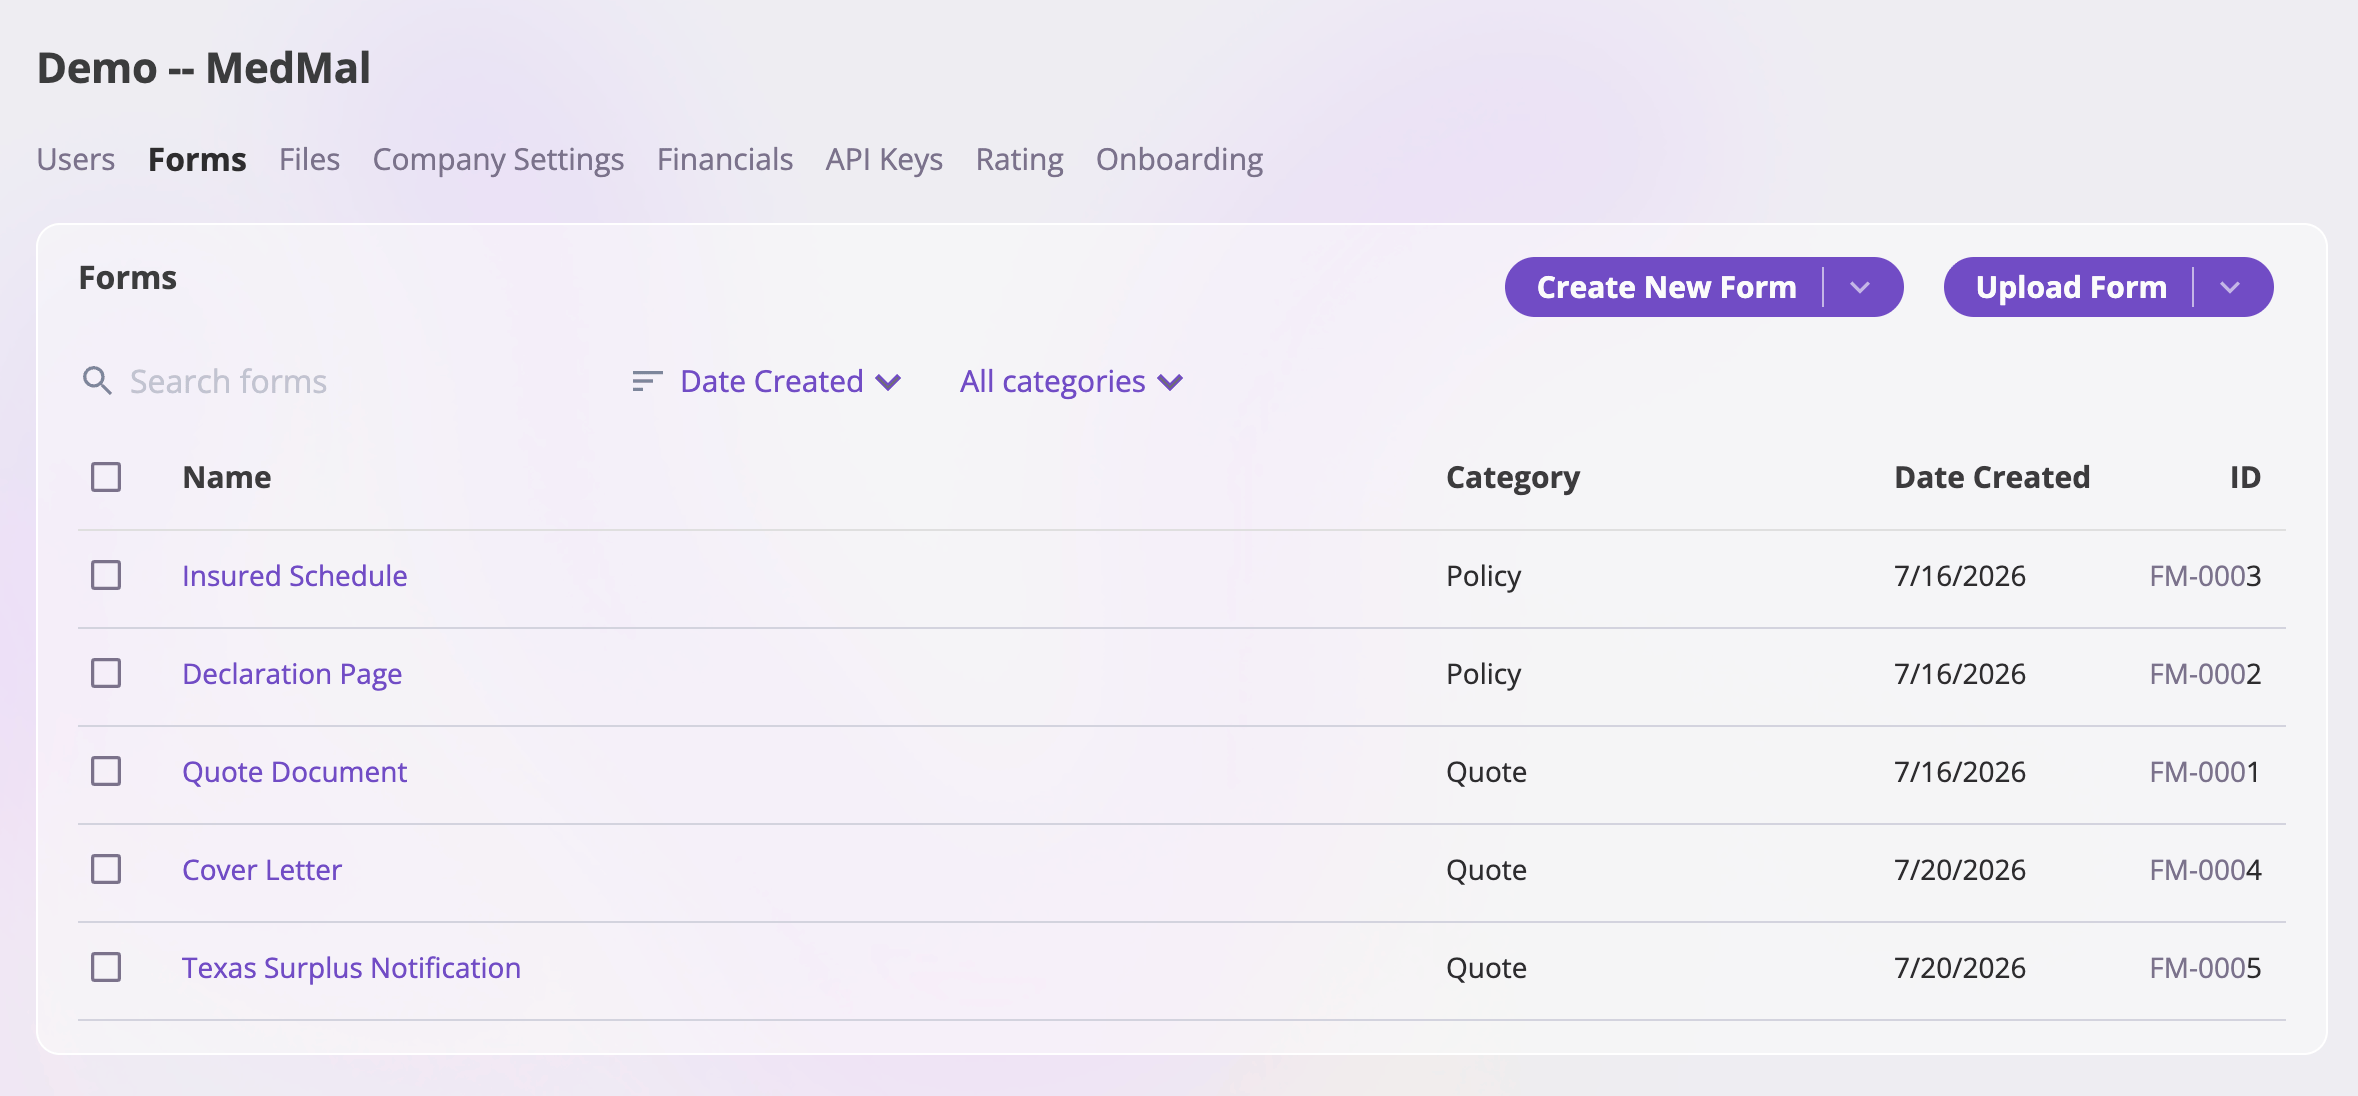
The list shows every template with its **Name**, **Category**, **Date
Created**, and **ID** — the `FM-XXXX` form number assigned automatically in
sequence when the template is created. That ID is how other configuration
(like auto-added-forms rules) refers to the template.
* **Search** filters by name or form number as you type.
* **Sort** by *Alphabetical* or *Date Created*.
* The **category dropdown** filters to one category, or *All categories*.
* **Selecting a template's name** opens it: an editable document opens in the
[document editor](#the-document-editor); a PDF template opens in a preview
instead (PDFs aren't editable — see [PDF vs. editable
templates](#pdf-vs-editable-templates)).
* **Checkboxes + Delete**: tick one or more rows (or the header checkbox for
all) and a **Delete** button appears at the top of the card. Deleting
removes the templates from the library; forms already generated from them
are not affected.
## Upload a template
**Upload Form** is a split button: pick the category (**Claim/Incident**,
**Quote**, or **Policy**) and a file picker opens. You can upload:
* **Word documents** (`.docx`, `.doc`) — including templates exported from
other systems.
* **Rich text and OpenDocument files** (`.rtf`, `.odt`) — converted to an
editable document automatically.
* **PDFs** (`.pdf`) — kept as-is, as static documents.
Everything except PDFs becomes an editable document you can open in the
document editor and enrich with smart tags. You can upload several files at
once; each becomes its own template in the chosen category.
### PDF vs. editable templates
The library holds two kinds of template, and the UI treats them differently:
| | Editable templates (Word/RTF/ODT uploads, created documents) | PDF templates |
| ------------------ | ------------------------------------------------------------ | --------------------------- |
| Selecting the name | Opens the document editor | Opens a read-only preview |
| Smart tags | Yes — inserted and filled at generation | No — the file is used as-is |
| Generated output | The document with smart tags resolved | An exact copy of the PDF |
Use a PDF for fixed collateral that never changes per entity (a brochure, a
state notice); use an editable template for anything that should carry the
quote's, policy's, or claim's data.
## Create a template from scratch
**Create New Form** is the same split button pattern: pick a category and a
blank document opens directly in the document editor. If you exit without
saving a brand-new document, it's discarded rather than left as an empty
template.
## The document editor
Editing a template opens the built-in document editor full-screen: a
word-processor canvas with a toolbar for formatting, plus AI Insurance's own
controls along the top.
## Form categories
Every template belongs to a **category**, chosen when you create or upload it.
The category decides where the form can be generated and which entity's data
its smart tags draw from:
| Category | Generated on | Smart tags fill from |
| ------------------ | --------------------------------------------------------------------------------- | ---------------------------- |
| **Claim/Incident** | An event, via its Actions menu (see [Event actions](/app/features/event-actions)) | The claim or incident's data |
| **Quote** | The quote flow's Forms step (see [Quoting](/app/workflows/quoting)) | The quote's data |
| **Policy** | The quote flow's Forms step; the generated form carries onto the policy at bind | The quote/policy data |
Quote and Policy templates are also the ones [auto-added
forms](/app/admin/auto-added-forms) rules can reference. A template whose
category shows as **Unknown** has no data scope: it can't be generated against
an entity and the editor offers no smart tags — assign it a real category in
the editor.
## The template list
The list shows every template with its **Name**, **Category**, **Date
Created**, and **ID** — the `FM-XXXX` form number assigned automatically in
sequence when the template is created. That ID is how other configuration
(like auto-added-forms rules) refers to the template.
* **Search** filters by name or form number as you type.
* **Sort** by *Alphabetical* or *Date Created*.
* The **category dropdown** filters to one category, or *All categories*.
* **Selecting a template's name** opens it: an editable document opens in the
[document editor](#the-document-editor); a PDF template opens in a preview
instead (PDFs aren't editable — see [PDF vs. editable
templates](#pdf-vs-editable-templates)).
* **Checkboxes + Delete**: tick one or more rows (or the header checkbox for
all) and a **Delete** button appears at the top of the card. Deleting
removes the templates from the library; forms already generated from them
are not affected.
## Upload a template
**Upload Form** is a split button: pick the category (**Claim/Incident**,
**Quote**, or **Policy**) and a file picker opens. You can upload:
* **Word documents** (`.docx`, `.doc`) — including templates exported from
other systems.
* **Rich text and OpenDocument files** (`.rtf`, `.odt`) — converted to an
editable document automatically.
* **PDFs** (`.pdf`) — kept as-is, as static documents.
Everything except PDFs becomes an editable document you can open in the
document editor and enrich with smart tags. You can upload several files at
once; each becomes its own template in the chosen category.
### PDF vs. editable templates
The library holds two kinds of template, and the UI treats them differently:
| | Editable templates (Word/RTF/ODT uploads, created documents) | PDF templates |
| ------------------ | ------------------------------------------------------------ | --------------------------- |
| Selecting the name | Opens the document editor | Opens a read-only preview |
| Smart tags | Yes — inserted and filled at generation | No — the file is used as-is |
| Generated output | The document with smart tags resolved | An exact copy of the PDF |
Use a PDF for fixed collateral that never changes per entity (a brochure, a
state notice); use an editable template for anything that should carry the
quote's, policy's, or claim's data.
## Create a template from scratch
**Create New Form** is the same split button pattern: pick a category and a
blank document opens directly in the document editor. If you exit without
saving a brand-new document, it's discarded rather than left as an empty
template.
## The document editor
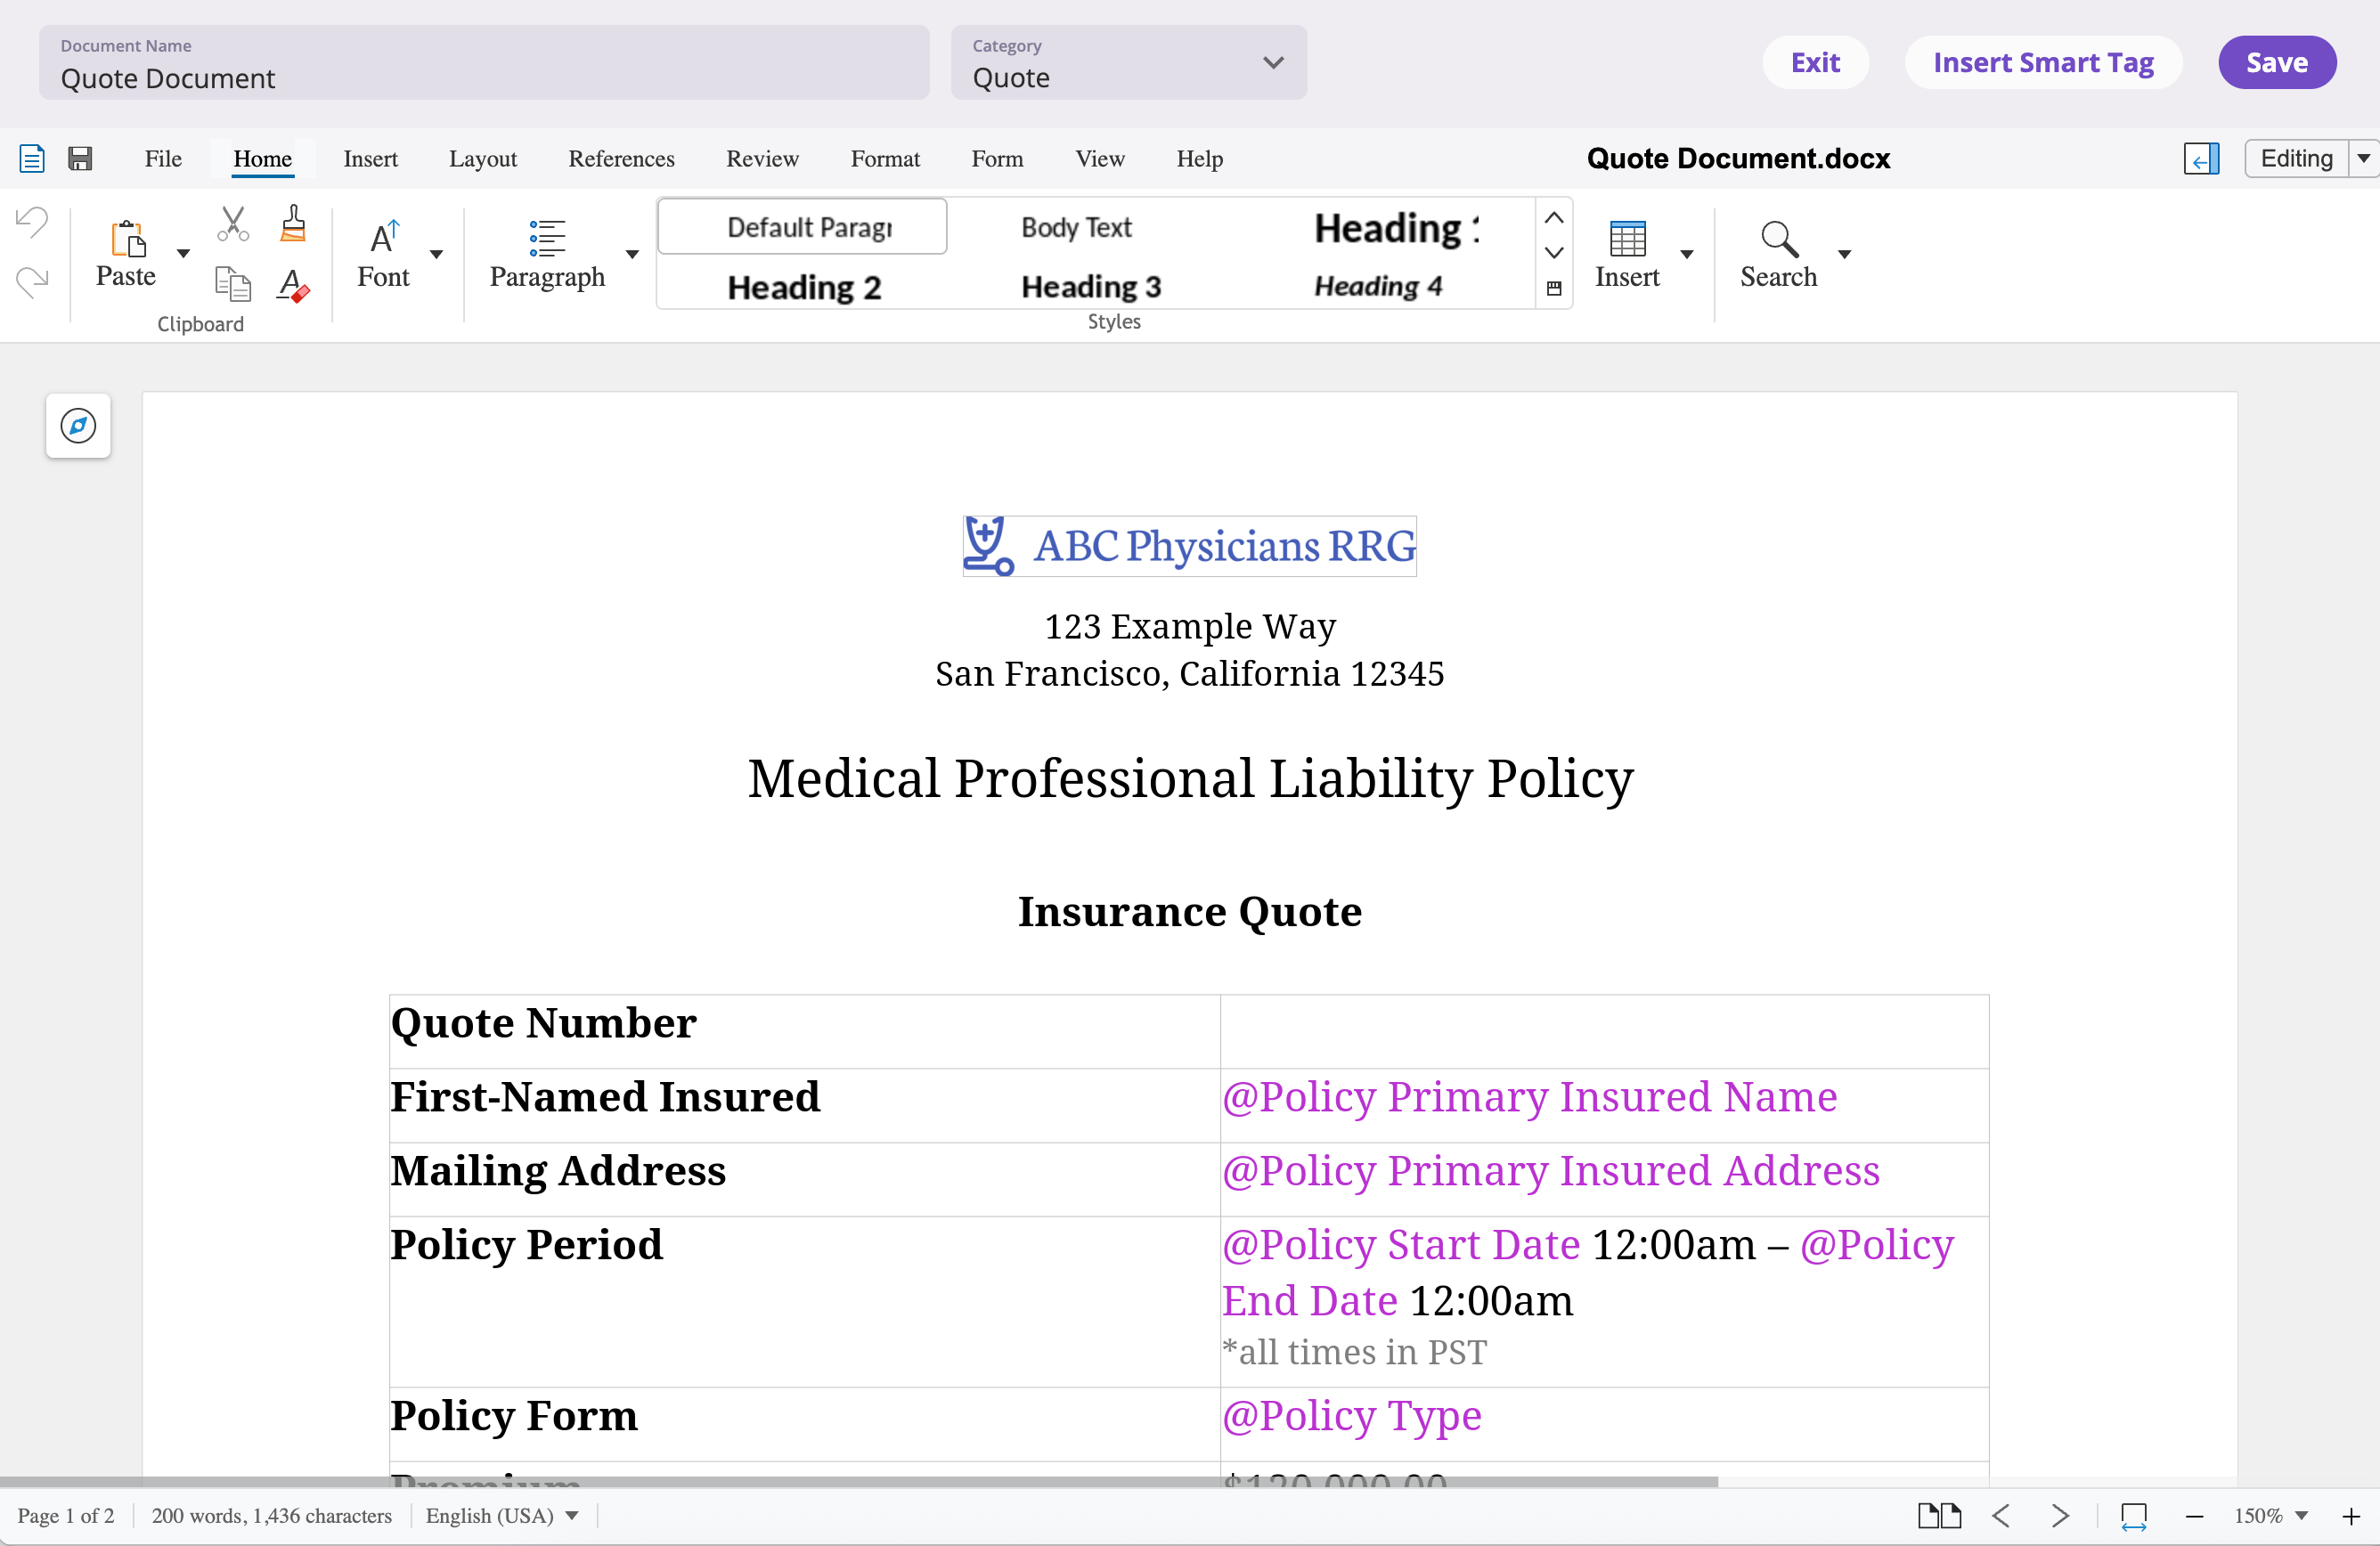
Editing a template opens the built-in document editor full-screen: a
word-processor canvas with a toolbar for formatting, plus AI Insurance's own
controls along the top.
 | Control | What it does |
| -------------------- | --------------------------------------------------------------------------------------------------------------------------------------------------------------- |
| **Document Name** | The template's name, shown in the library and the generation pickers. |
| **Category** | The template's category. You can move a template between the real categories (and move an *Unknown* template onto one), but nothing can be set back to Unknown. |
| **Insert Smart Tag** | Opens the [smart-tag sidebar](#smart-tags). Hidden while the category is Unknown. |
| **Save** | Saves the document plus any name/category change, and stays in the editor. |
| **Exit** | Asks what to do with unsaved work: **Save and Exit**, **Exit Without Saving**, or **Cancel** to keep editing. |
Saving a template creates a new saved version of it. Documents that were
already generated keep the exact version of the template they were generated
from — your edits affect **future** generations only, so an in-flight quote's
paperwork never changes underneath it.
## Smart tags
Smart tags are placeholders that fill with entity data when a form is
generated — the insured's name, an address, a premium, a coverage table.
Which tags are available depends on the template's category and on
[how your company is configured](/app/getting-started/configuration): your
configured fields drive the tag list, alongside built-in tags (like the
current date).
Select **Insert Smart Tag** to open the sidebar:
| Control | What it does |
| -------------------- | --------------------------------------------------------------------------------------------------------------------------------------------------------------- |
| **Document Name** | The template's name, shown in the library and the generation pickers. |
| **Category** | The template's category. You can move a template between the real categories (and move an *Unknown* template onto one), but nothing can be set back to Unknown. |
| **Insert Smart Tag** | Opens the [smart-tag sidebar](#smart-tags). Hidden while the category is Unknown. |
| **Save** | Saves the document plus any name/category change, and stays in the editor. |
| **Exit** | Asks what to do with unsaved work: **Save and Exit**, **Exit Without Saving**, or **Cancel** to keep editing. |
Saving a template creates a new saved version of it. Documents that were
already generated keep the exact version of the template they were generated
from — your edits affect **future** generations only, so an in-flight quote's
paperwork never changes underneath it.
## Smart tags
Smart tags are placeholders that fill with entity data when a form is
generated — the insured's name, an address, a premium, a coverage table.
Which tags are available depends on the template's category and on
[how your company is configured](/app/getting-started/configuration): your
configured fields drive the tag list, alongside built-in tags (like the
current date).
Select **Insert Smart Tag** to open the sidebar:
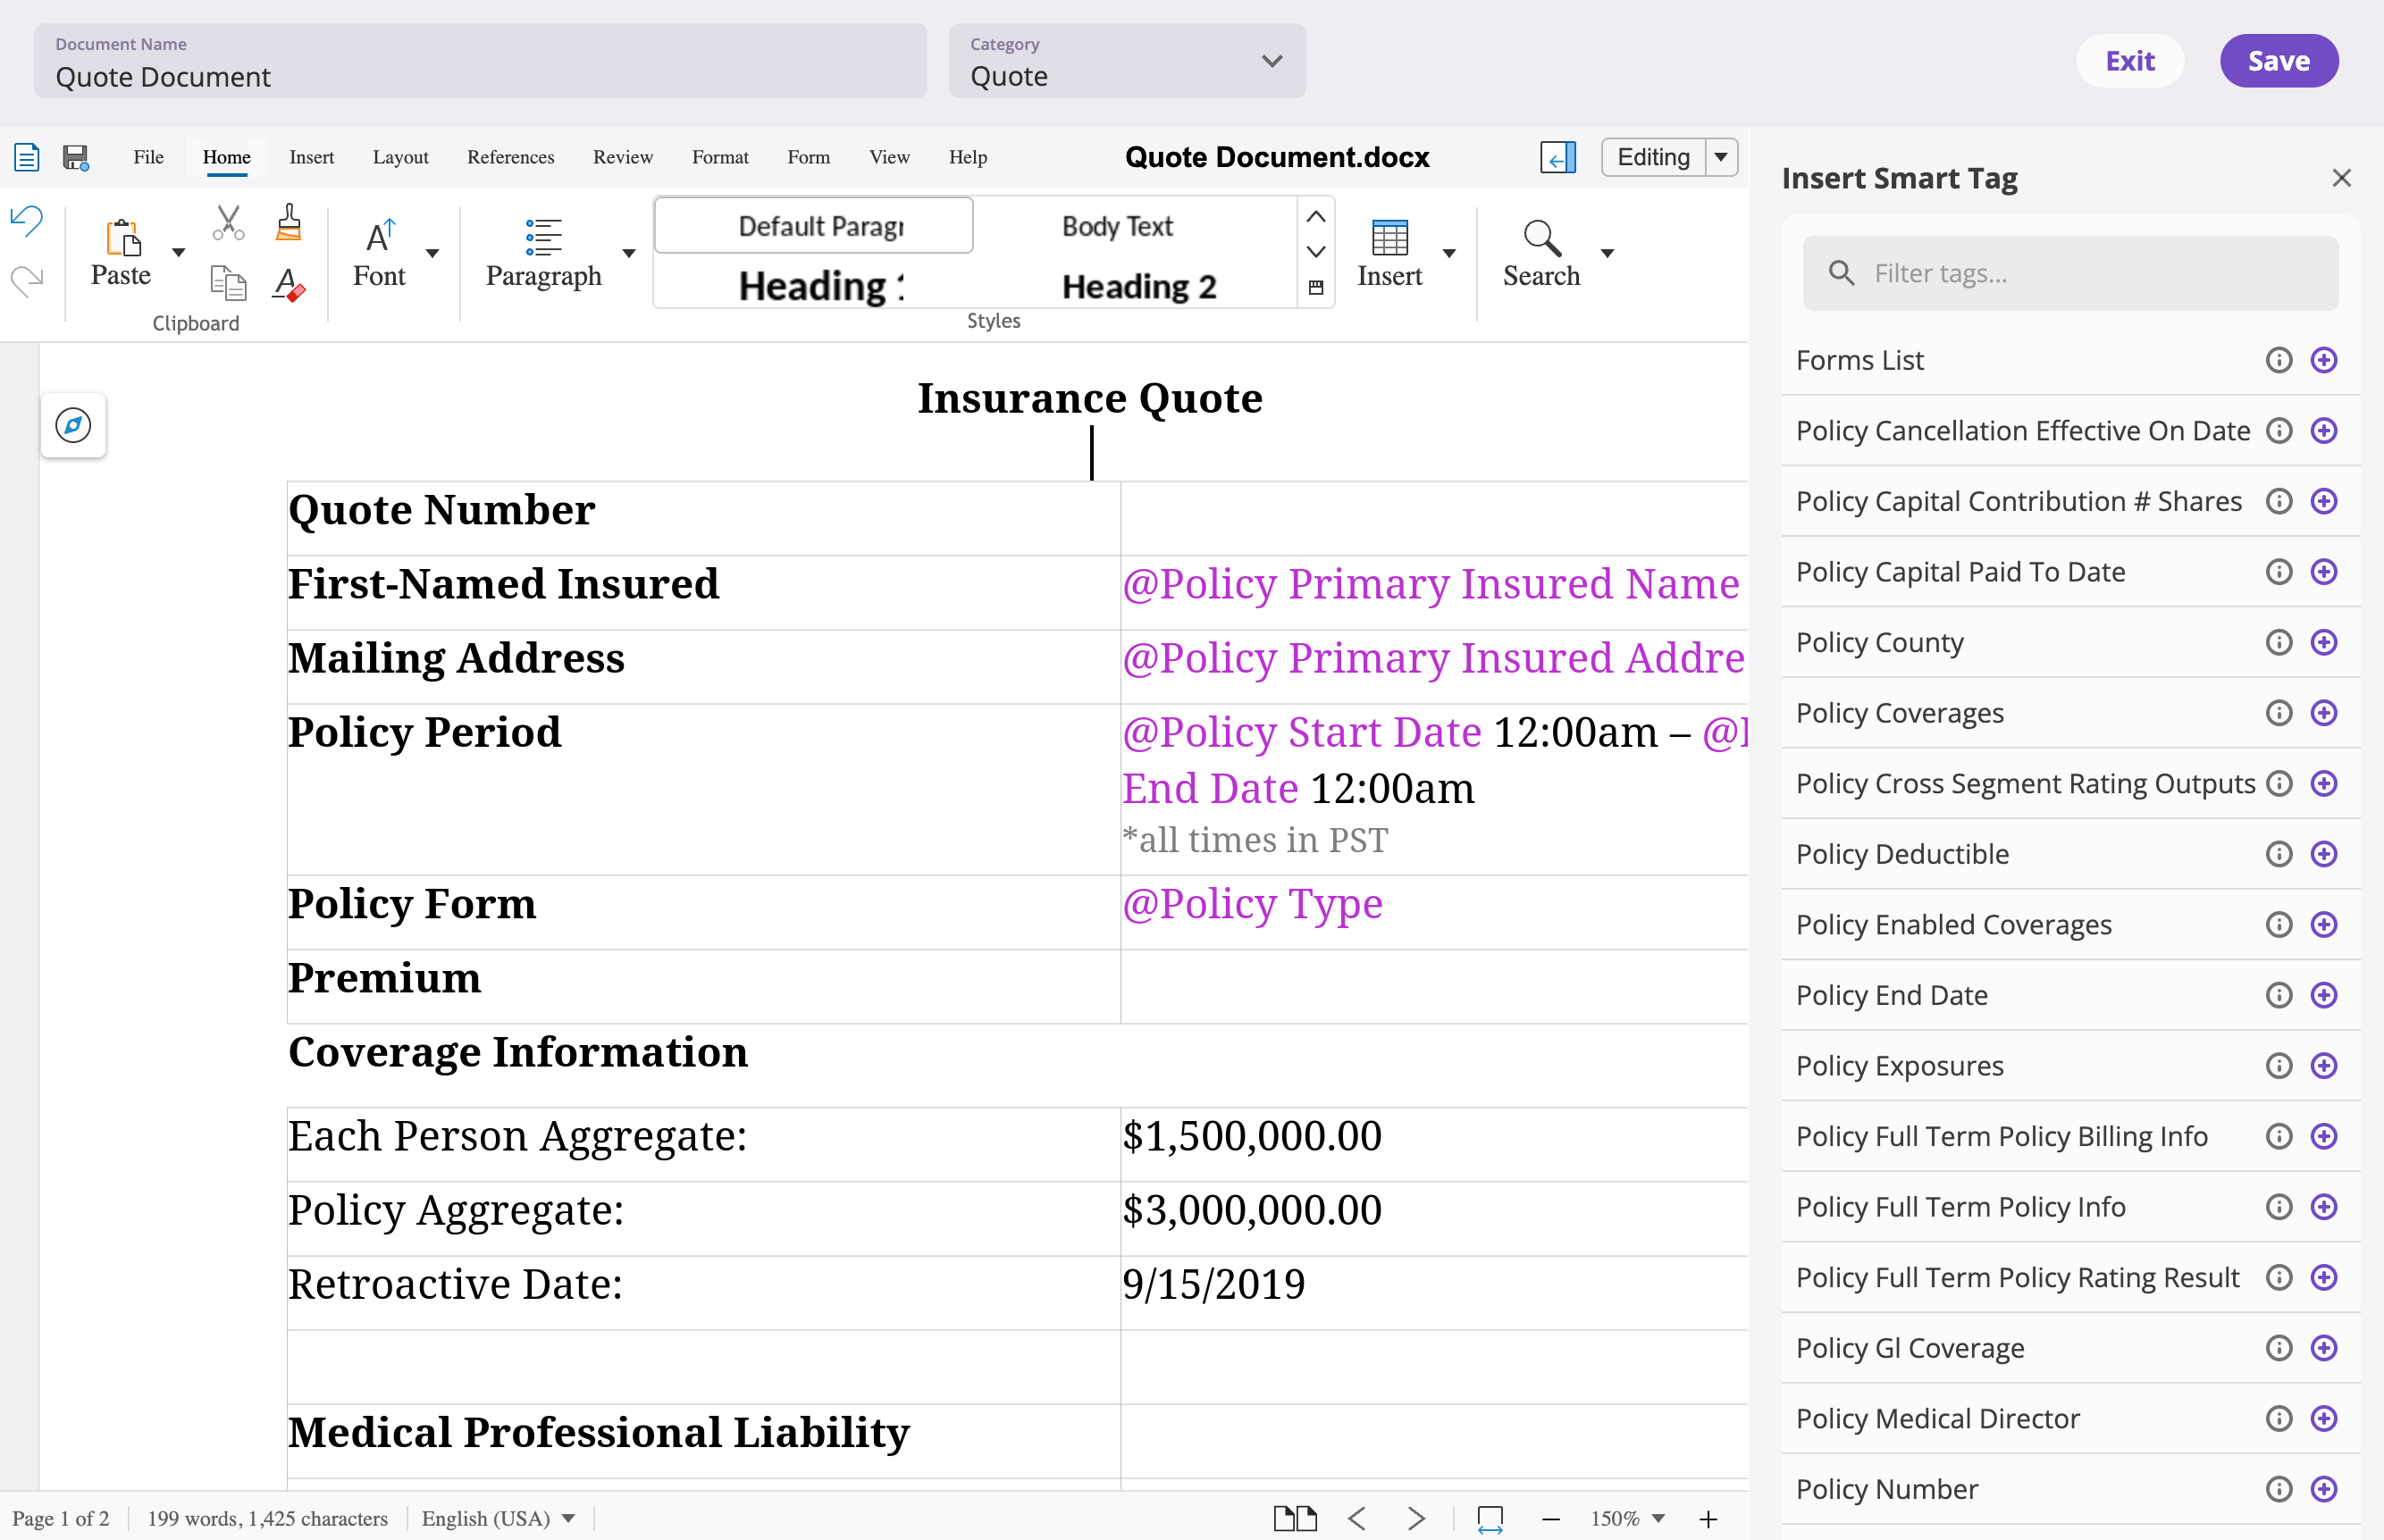 * **Filter tags…** narrows the list by name.
* Each row shows the tag's **display name** and a description of what it
resolves to.
* **Selecting a tag inserts it at the cursor** in the document. In the
template editor there's no entity to pull data from yet, so the tag appears
as a highlighted `@Display Name` placeholder; when a form is generated from
the template, every tag is replaced with the entity's current value.
Place tags anywhere in the document — inline in a sentence, in a header, in a
table cell. Table-shaped tags (like a coverage schedule) expand into a full
table at generation. For how generated forms behave on quotes, policies, and
events — including refreshing tag values after data changes — see
[Generating forms](/app/features/forms).
* **Filter tags…** narrows the list by name.
* Each row shows the tag's **display name** and a description of what it
resolves to.
* **Selecting a tag inserts it at the cursor** in the document. In the
template editor there's no entity to pull data from yet, so the tag appears
as a highlighted `@Display Name` placeholder; when a form is generated from
the template, every tag is replaced with the entity's current value.
Place tags anywhere in the document — inline in a sentence, in a header, in a
table cell. Table-shaped tags (like a coverage schedule) expand into a full
table at generation. For how generated forms behave on quotes, policies, and
events — including refreshing tag values after data changes — see
[Generating forms](/app/features/forms).