
Editing columns
Every list page has an Edit Columns button that opens the column manager: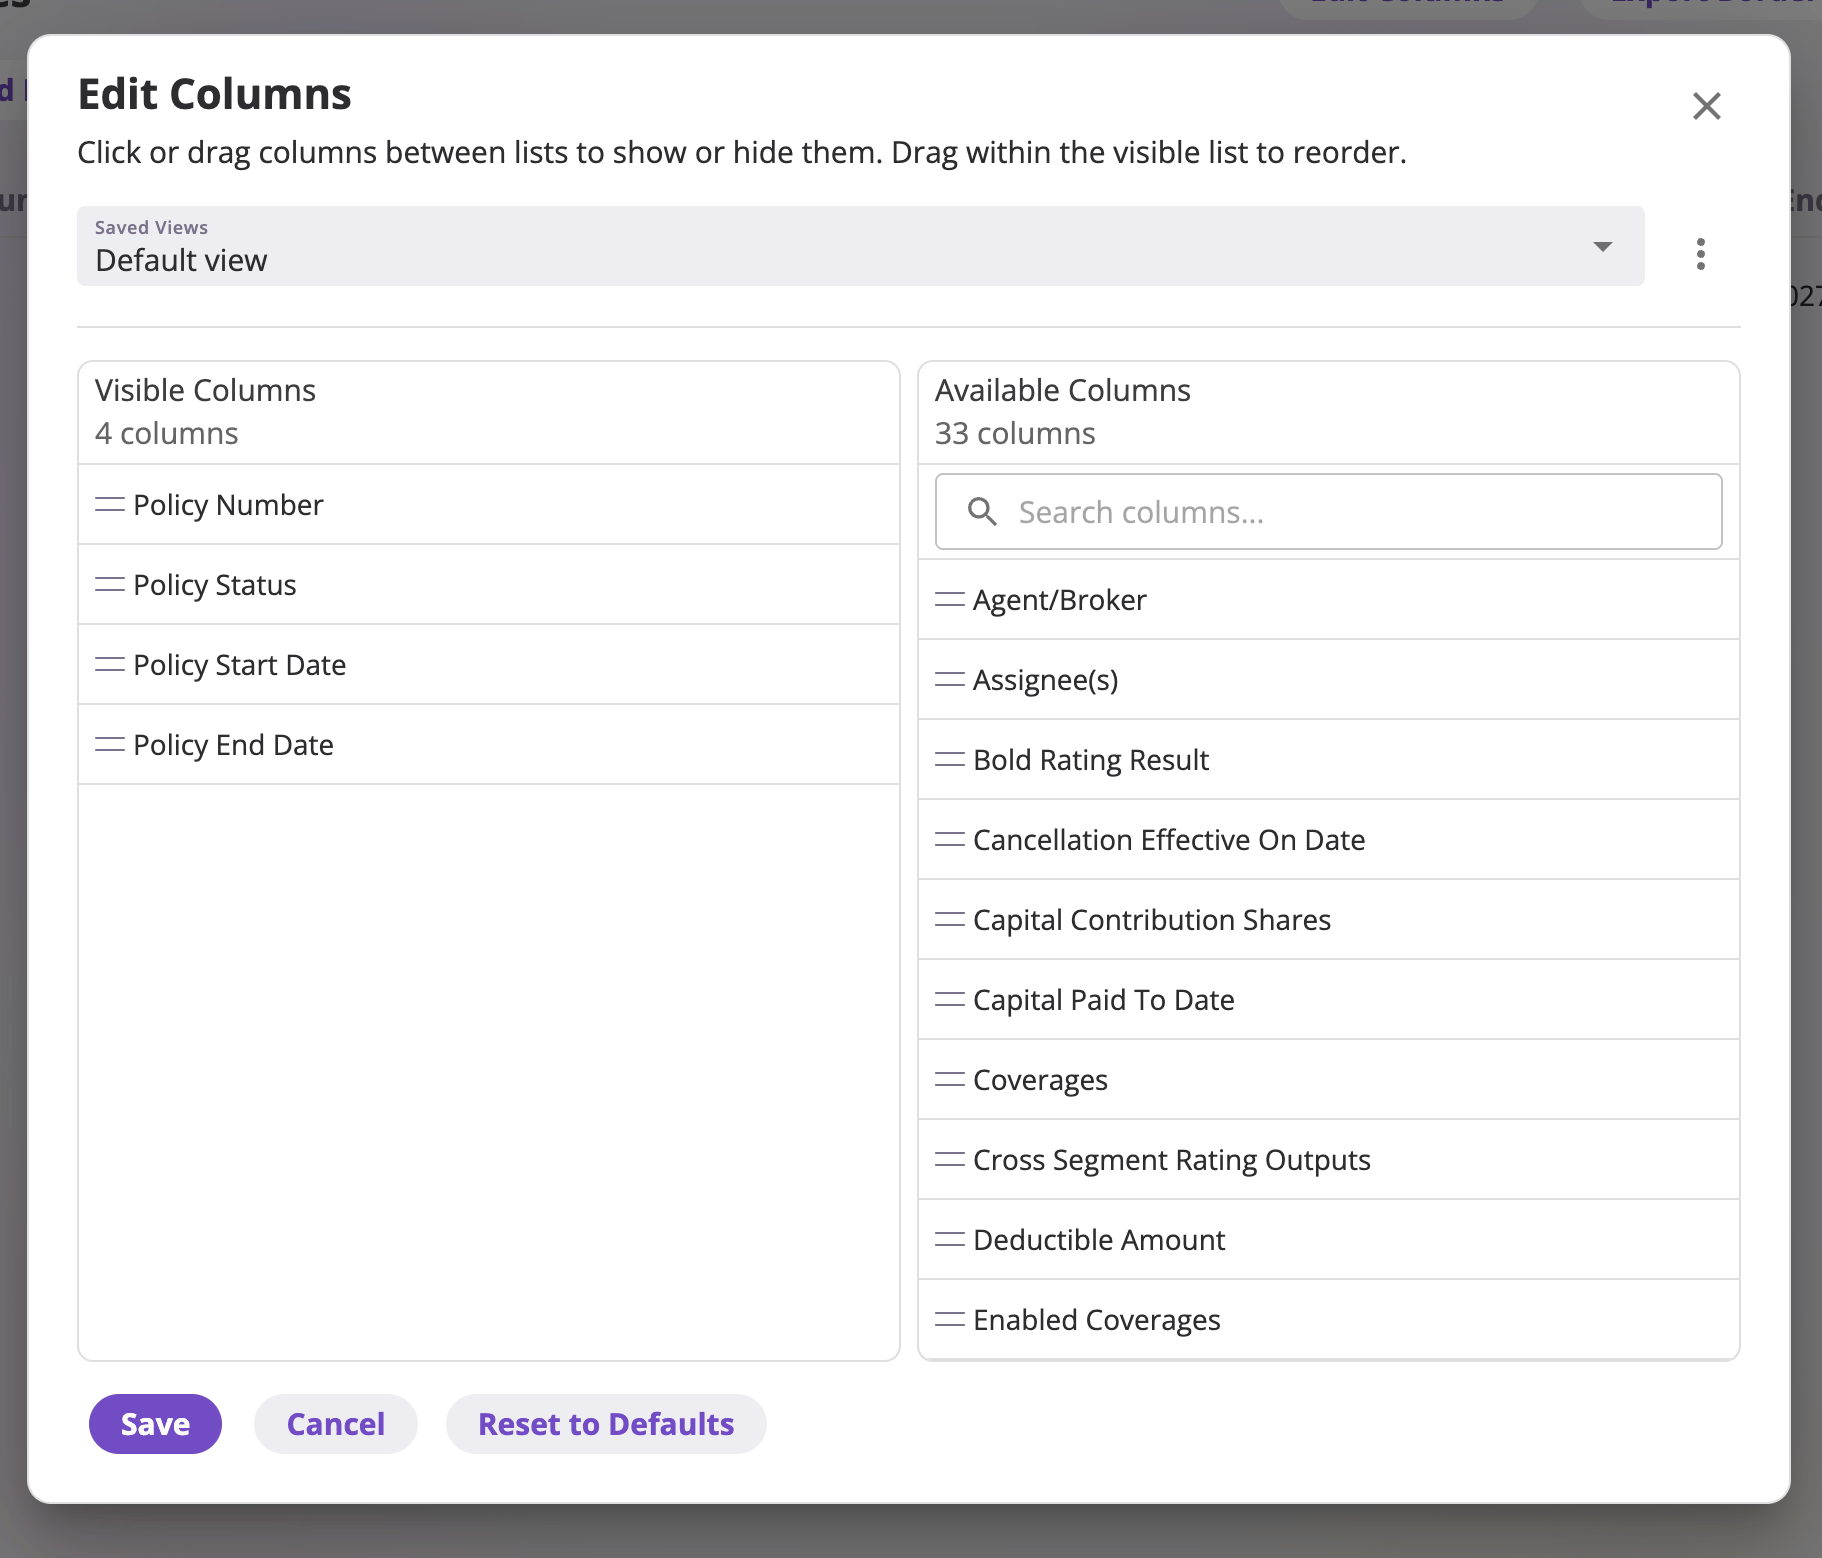
Edit Columns — visible columns on the left, available columns on the right, with the Saved Views dropdown on top.
- Two lists — Visible Columns and Available Columns — with a live count of each. Click or drag columns between lists to show or hide them. Drag within the visible list to reorder.
- Search columns… filters the available list; available columns are sorted alphabetically and include every configured field plus system columns like Created, Last Updated, and Created By.
- Save applies your arrangement; Cancel discards it; Reset to Defaults returns to the page’s standard columns.
Sorting
On the submissions, quotes, exposures, and events lists, click a column header to sort the whole list by that column; click it again to switch between ascending and descending. A list starts sorted by Last Updated, newest first. Sorting covers every record that matches your filters, not just the page you’re looking at. Each column sorts by what it shows:
Blank values always come last, whichever direction you sort.
Some columns can’t be sorted yet: linked records, Created By and Updated
By, calculated columns, and embedded exposures. Their sort arrow is greyed
out — hover over the header to see why.
If a shared link or saved view asks for a sort that no longer applies — for
example, the column was removed — the list ignores it and falls back to its
default sort.
Filters
Add Filters opens the filter picker: choose one of the filters configured for that list, set the condition on the right, and Apply. Filters are independent of columns, so a calculated value may be filterable without appearing in Edit Columns. Each active filter becomes a pill above the table — click a pill to edit it, or its X to remove it.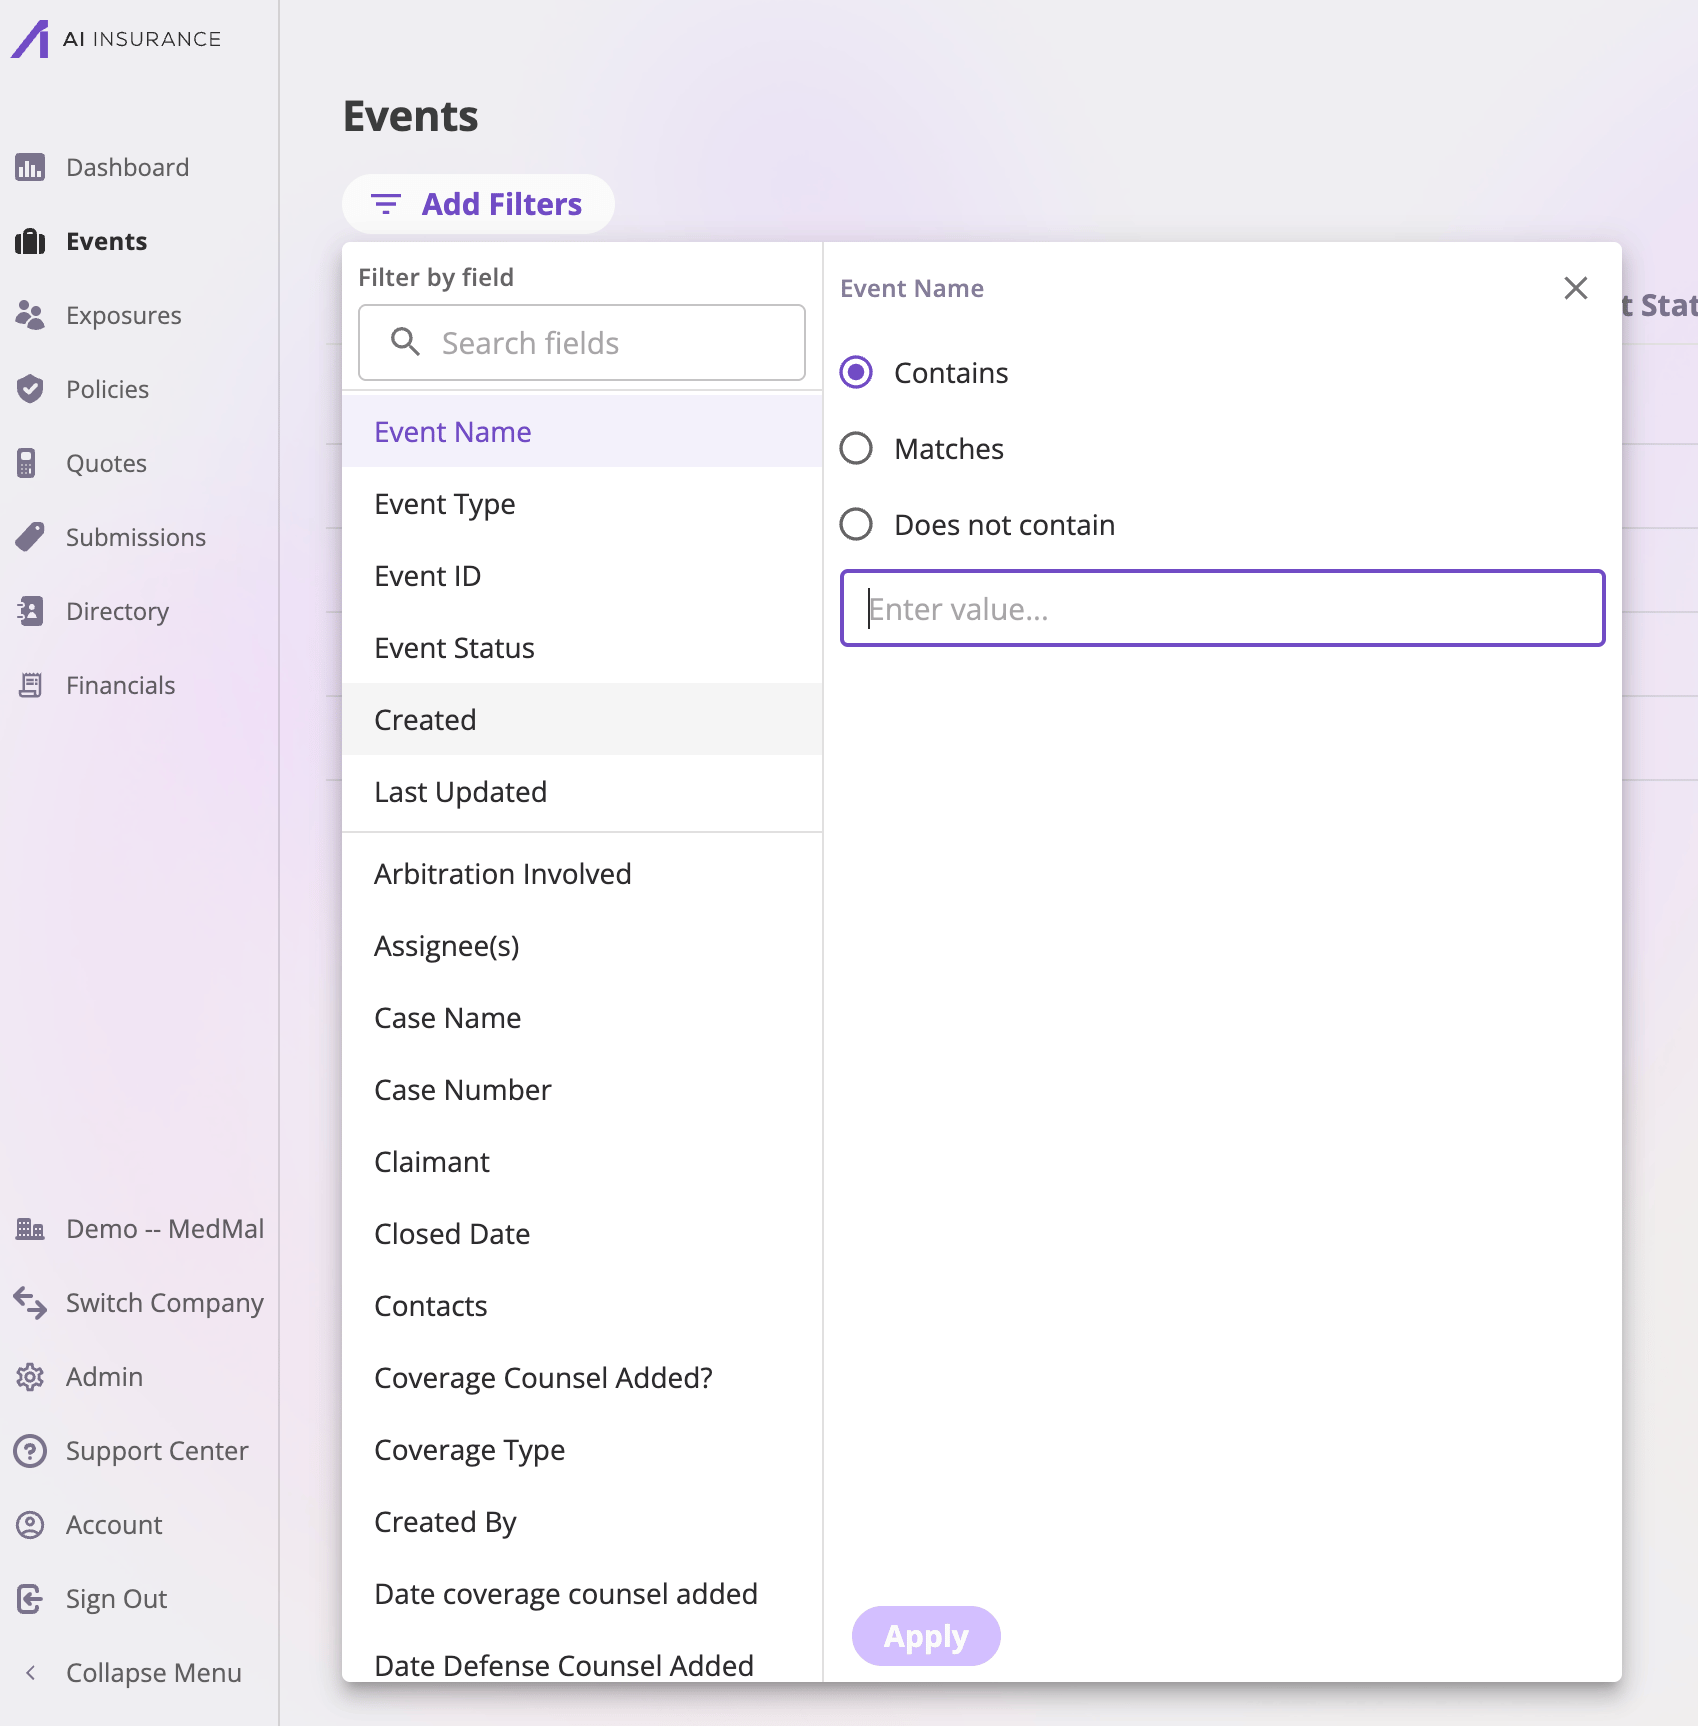
The filter picker — pick a field, choose an operator, Apply; active filters become editable pills.
Filters (along with the sort and page) live in the page’s URL — so the
filtered list you’re looking at can be shared as a link, and an
export can carry the same filters.
Saved views
On the five entity list pages, your column arrangement can be saved as a view. Views are managed from the Saved Views dropdown at the top of the Edit Columns dialog. A view captures the columns: which are visible, their order, their widths, and the page size. Filters and sort are not part of a view — they stay in the URL, so one view works with any filters.- Save current columns as view… — name the arrangement (Save view → View name → Save).
- Switching — pick any view from the dropdown; Default view is the system-standard arrangement. While one of your saved views is active, column changes you make are saved into it automatically — there’s no separate “update” step.
- Rename view… and Delete view — on views you own. Deleting an active view returns you to the default arrangement.
Sharing views
A view starts private to you. On a view you own, Share with company makes it visible to everyone at your company (grouped under Shared with me, labeled with the owner’s name); Make private takes it back. Only the owner can change a shared view — everyone else can apply it, or choose Save as my own copy… to clone it (pre-named “Copy of «name»”) and tailor the copy.Default views
Set as my default makes a view you own load automatically when you open that list page; Reset to default view clears it. Defaults are personal — sharing a view never changes what anyone else sees by default.Exporting a list
Each entity list page has an export button at the top right — Export Policies, Export Quotes, Export Submissions, Export Exposures, Export Events — which opens the export page for that list, carrying over your current filters and sort.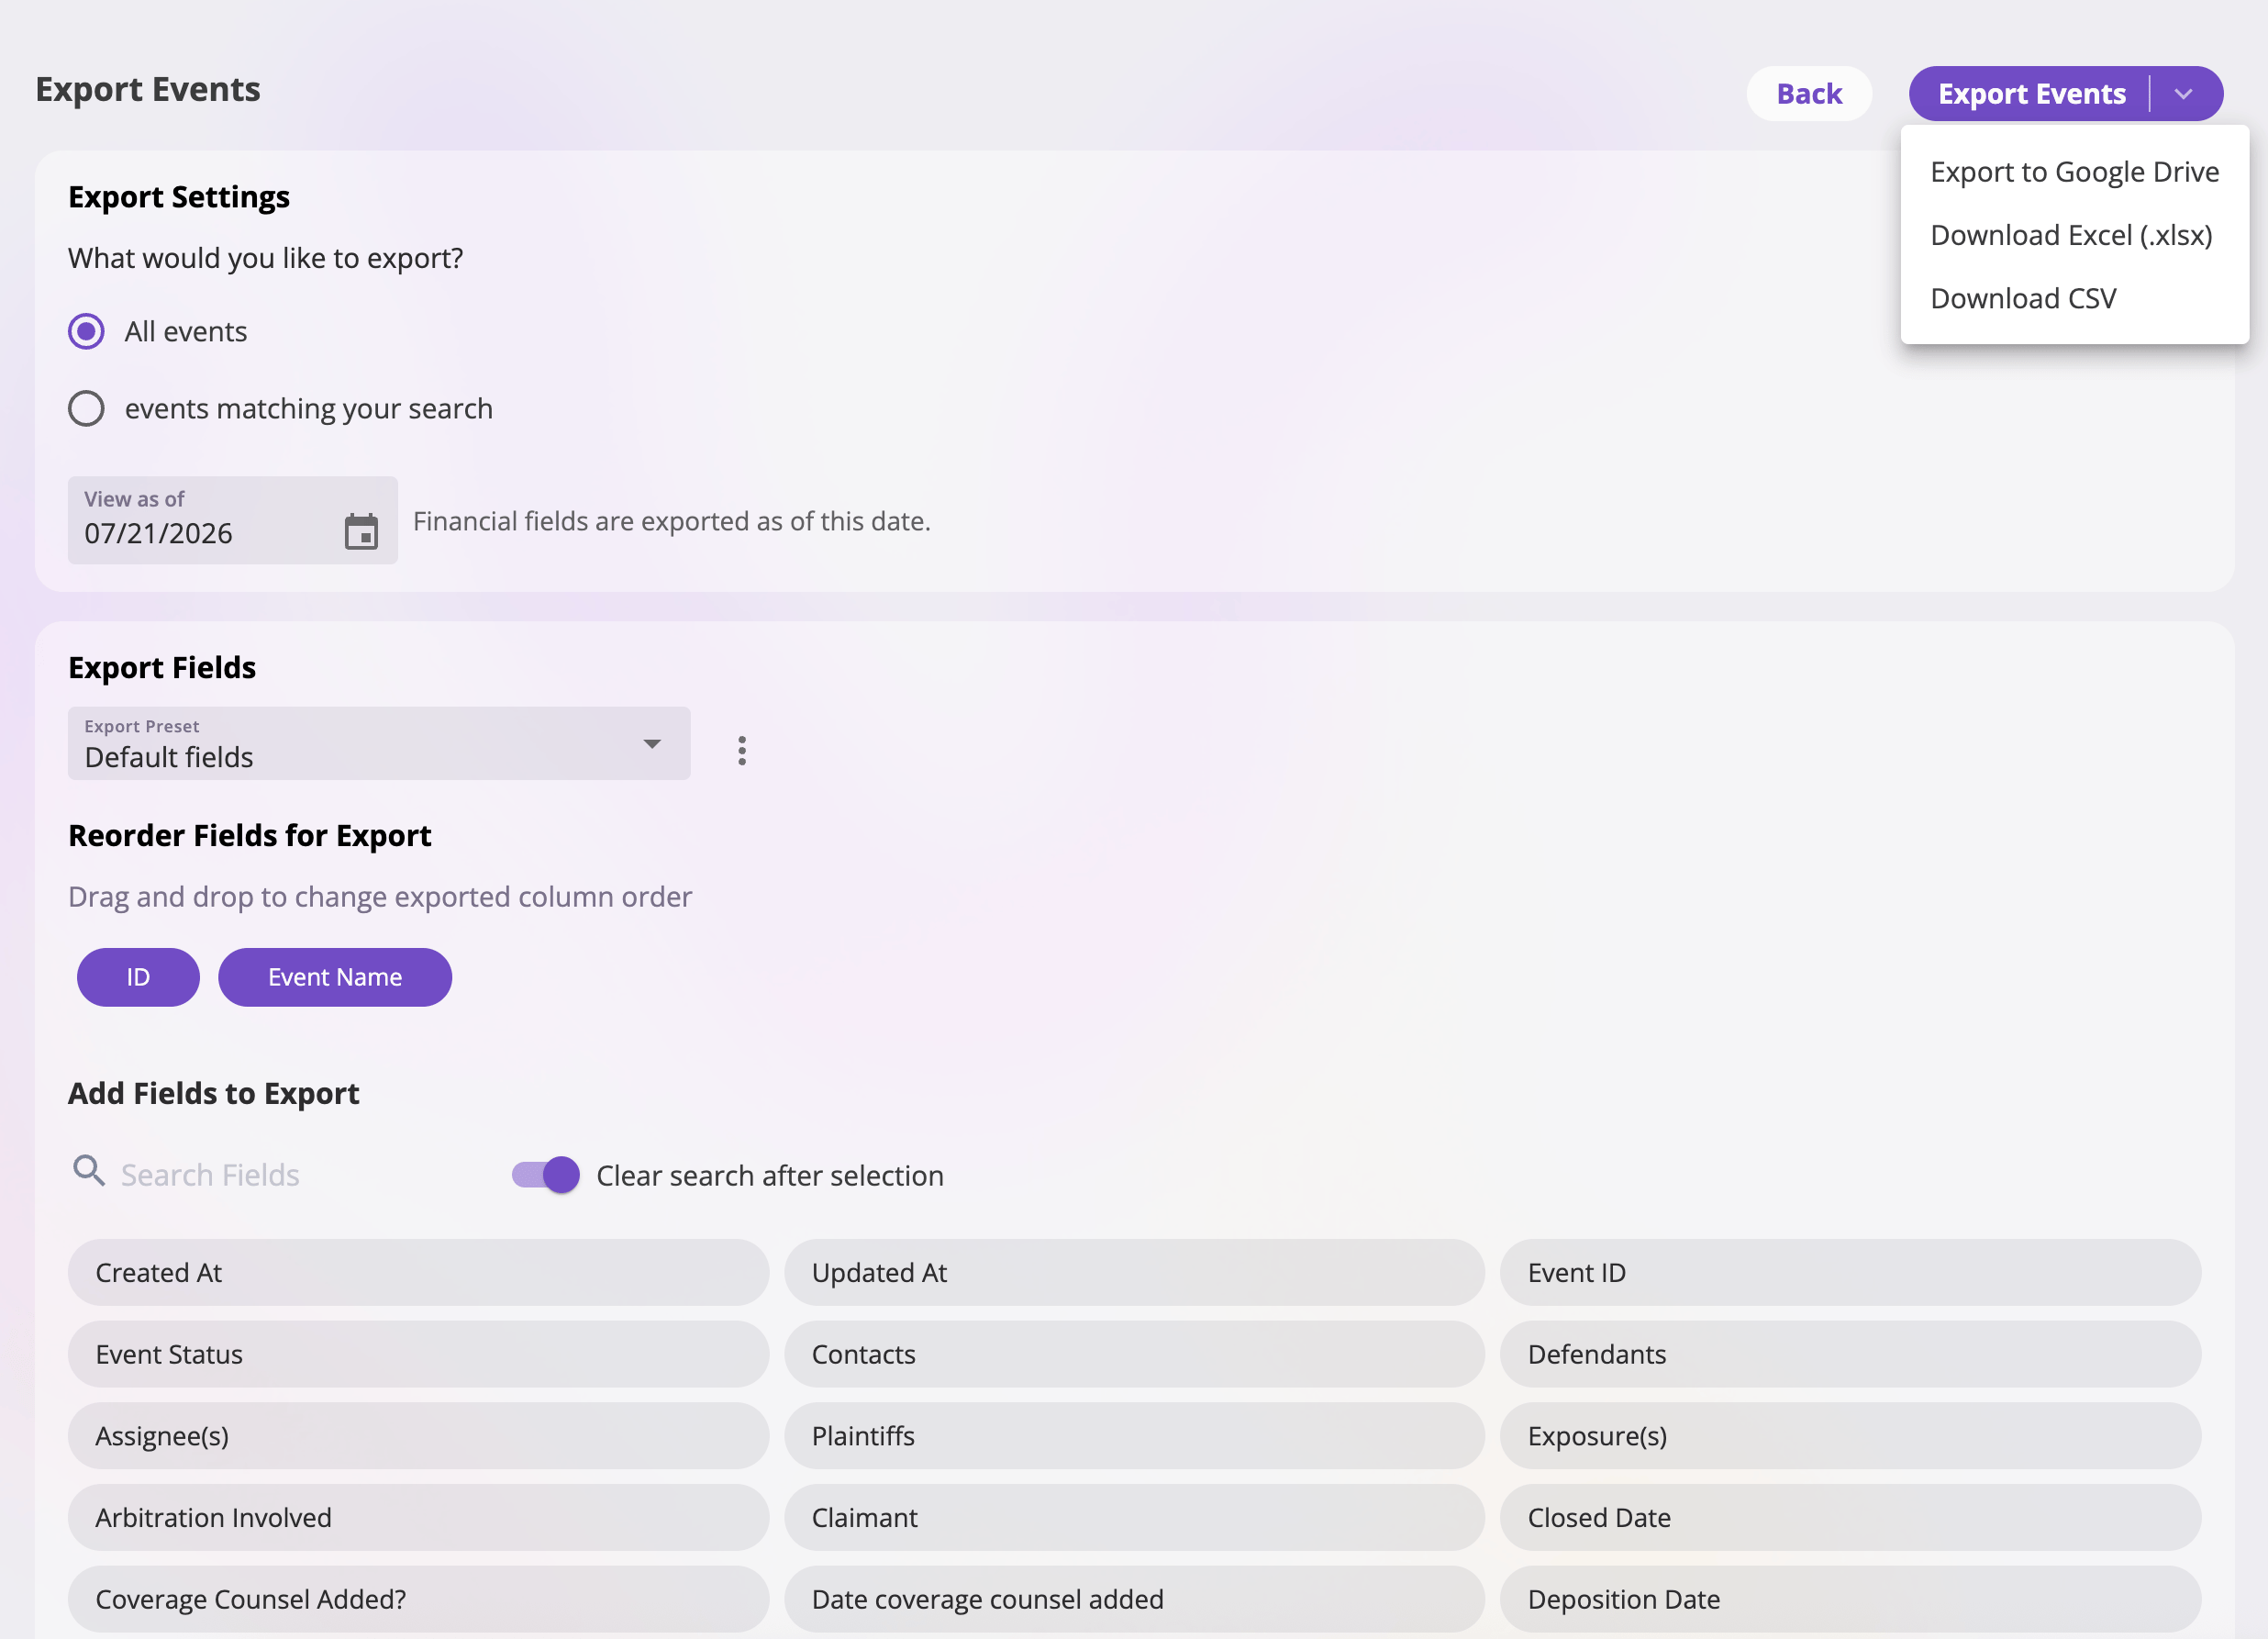
The export page — choose what to export, pick and order the fields, then export to your destination.
1
Choose what to export
Under Export Settings — What would you like to export? — pick
All records, or only the records matching your search (the filters
you had on the list). Policy and event exports also ask for a View as
of date, so each record is exported as of that date (financial fields
included).
2
Pick and order the fields
The Export Fields card controls the columns of the export —
independent of the list’s visible columns. Reorder Fields for Export
shows the selected fields as chips (drag and drop to change exported
column order; remove any except the required ID and name fields), and
Add Fields to Export offers the other columns your company has set up
for this export, with a Search Fields box. Or start from a saved
export preset.
3
Start the export
Select the export button. The export runs in the background and the
page switches to its Jobs tab, where the new run appears at the top
with a status of Queued, then Running, then Succeeded. You can keep
working elsewhere; a large export no longer ties up your browser.
4
Pick a destination
On a Succeeded run, the row’s menu offers three destinations for the same
file: Export to Google Drive, Download Excel (.xlsx), and
Download CSV. Downloads are named with the date, your company, and the
entity (e.g. an …Policies Export file).
The Jobs tab
Every export page has two tabs: Export (the settings and field picker above) and Jobs, which lists this entity’s recent export runs, newest first, with when each started, its status, and its row count.- Starting the same export twice while the first is still running returns you to the run already in progress rather than starting a second one. Change the fields, filters, or as-of date to start a distinct run.
- A company can have three exports in flight at once; a fourth waits until one finishes.
- A Failed run shows its reason inline. Exported files are kept for 30 days; after that the run reads Expired and its downloads are no longer available, so re-run the export if you need the file again.
Calculated export columns
The fields offered under Add Fields to Export are your company’s configured export columns. A column is usually a field, but it can also be a calculation with its own header: Days In Term from the start and end dates, Premium Per Day, an In Force? yes/no from the status, or a count of exposures. Calculated columns are authored by an administrator under Admin → Configuration → Exports, where a plain-English description can be turned into the expression for you; each column declares its own type so dates, numbers, and currency are formatted correctly in the file. See How your app is configured.Linked records
A field that links to another record prints that record’s name, the same name the app shows on screen: the policy number, exposure name, event name, quote or submission number, a person’s or organization’s name, or a user’s name (or email if they have no name). A field with several links prints the names in alphabetical order, separated by commas. Calculated columns print names for any record or user ID in their result. A link whose record has no name, or that can no longer be found, prints a placeholder with its ID:(unnamed Policy <id>), (deleted Policy <id>), or
(removed User <id>) for a user who is no longer a member. The exported
record’s own ID column is unchanged.
Exports don’t need any Directory permission. The permission to export that
list is enough, including for columns that show contacts. Downloads from a
record page’s tables print names the same way.
Notes columns
If you can view notes, Add Fields to Export also offers Notes and Notes Last Updated on every entity export. Notes puts all of a record’s notes in one cell, newest first, each starting with its date and time (in UTC) and its author:Exporting to Google Drive
The first Drive export asks you to sign in to Google and grant access (only to files the app creates); a pop-up blocker can block this — allow pop-ups and try again. Then pick a destination folder in the Google Drive picker, and the export is written there as a Google Sheets spreadsheet. When it finishes, a confirmation appears with an Open spreadsheet link straight to the new sheet.Export presets
An export preset is a saved field selection for the export page — the export-side sibling of saved views. The Export Preset dropdown at the top of the Export Fields card starts on Default fields; the menu next to it manages presets:- Save current fields as preset… — name and save the current selection.
- Update preset with current fields — overwrite a preset you own with what’s currently selected (presets don’t auto-save, unlike views).
- Rename preset… / Delete preset — on presets you own.
- Set as my default / Reset to default — make a preset load automatically on this export page.
- Share with company / Make private — shared presets appear for everyone under Shared with me, read-only; others can apply one or Save as my own copy… to clone it.
Other exports
A few exports have their own purpose-built surfaces and are documented with their features:- Bordereau export — the policies list also has an Export Bordereau button: the same field/preset/destination machinery, scoped by a reporting date range. See Policies.
- Financial exports — the Financials tables (transactions, loss & operating report, reserves) have one-click Export buttons that export exactly the rows on screen, honoring the page’s filters, to the same three destinations. See Reference frames for how each exported figure gets its sign.
- Rating run logs — exportable from the admin area; see Rating run logs.