
Event and policy billing start differently. Event invoices are recorded as
individual transactions. Policy invoices are planned from the policy’s
pricing and invoice target, either while quoting or from the bound policy’s
Financials tab. Once created, both use the same invoice and payment lifecycle.
Billing in the quote wizard
The quote wizard follows Rating → Invoice Target → Invoices.- Generate Rating runs even when billing inputs are missing. The Invoice Target waits until you enter those inputs. Its warning lists each unmet condition; the GL/PL starter asks you to select a Billing Mode and enter a Broker Commission Rate. If a target already exists, it remains visible and is marked out of date when you rate without them.
- Billing Inputs is your company’s input card at the top of the billing step, shown only when policy invoicing is enabled. Dropdown selections update the Invoice Target automatically; typed text and number changes apply when you leave the field.
- Invoice generation settings contains your payment controls. Changes there apply when you generate invoices, and never rewrite the invoices already on screen. The Invoice Target card owns the target’s status and retry action. Once the inputs are ready, the target updates automatically. A spinner beside the card title stays visible through up to three attempts without replacing the current status message. When complete Billing Inputs change against current rating, only this spinner is shown while the automatic update is queued or running; if all attempts fail, the card shows Retry. The out-of-date warning is reserved for states that cannot automatically update and waits briefly before appearing. Changing a rating input pauses billing refresh until you generate rating again, while the last target stays visible as out of date. The target is replaced only after rating and Billing Inputs are current and a new target is produced; in-progress work never replaces its amounts with placeholders.
- Generate Invoices builds the plan, every time, from your current settings. It stays available whenever the Invoice Target is current and the settings are valid — including when the invoices already match the target. If you have added, edited or marked invoices to void in this transaction, it asks you to discard that work first and then starts again from the original invoices; cancelling leaves everything as it was. Rating and automatic target refresh leave invoices alone. The Invoice Target shows Amount, Invoiced and Difference whenever invoices exist; differing lines and the Billing step show that invoices are out of date.
- You can also build the plan by hand: Add Invoice, edit an invoice’s payee, dates and line items, or void one. Your settings stay as you left them, and a hand-built plan that matches the target is ready to bind without generating again.
- On an endorsement, the policy’s existing invoices count immediately. The Existing Invoices setting decides what generation does with them — keep them and bill only the difference, or void the eligible ones and reissue. Paid invoices and invoices with live payments always remain.
Where invoices live
Invoices appear in four working contexts:- On the event — each claim or incident’s Financials tab lists the transactions linked to that event, beneath its Loss & Operating Report. This is also where new invoices are recorded. See Handling claims.
- On the policy — the policy’s Financials tab shows invoice balances, pricing and earning history, and every invoice linked to that policy. This is also where an authorized user can configure or rebalance the policy’s billing plan.
- Company Event Financials — Financials in the sidebar opens the Event Financials page: an Overview report aggregated across every event, above the full, searchable company-wide invoice listing.
- Company Policy Financials — the Policy Financials workspace rolls up policy balances and earnings and lists policy-linked invoices across the book.
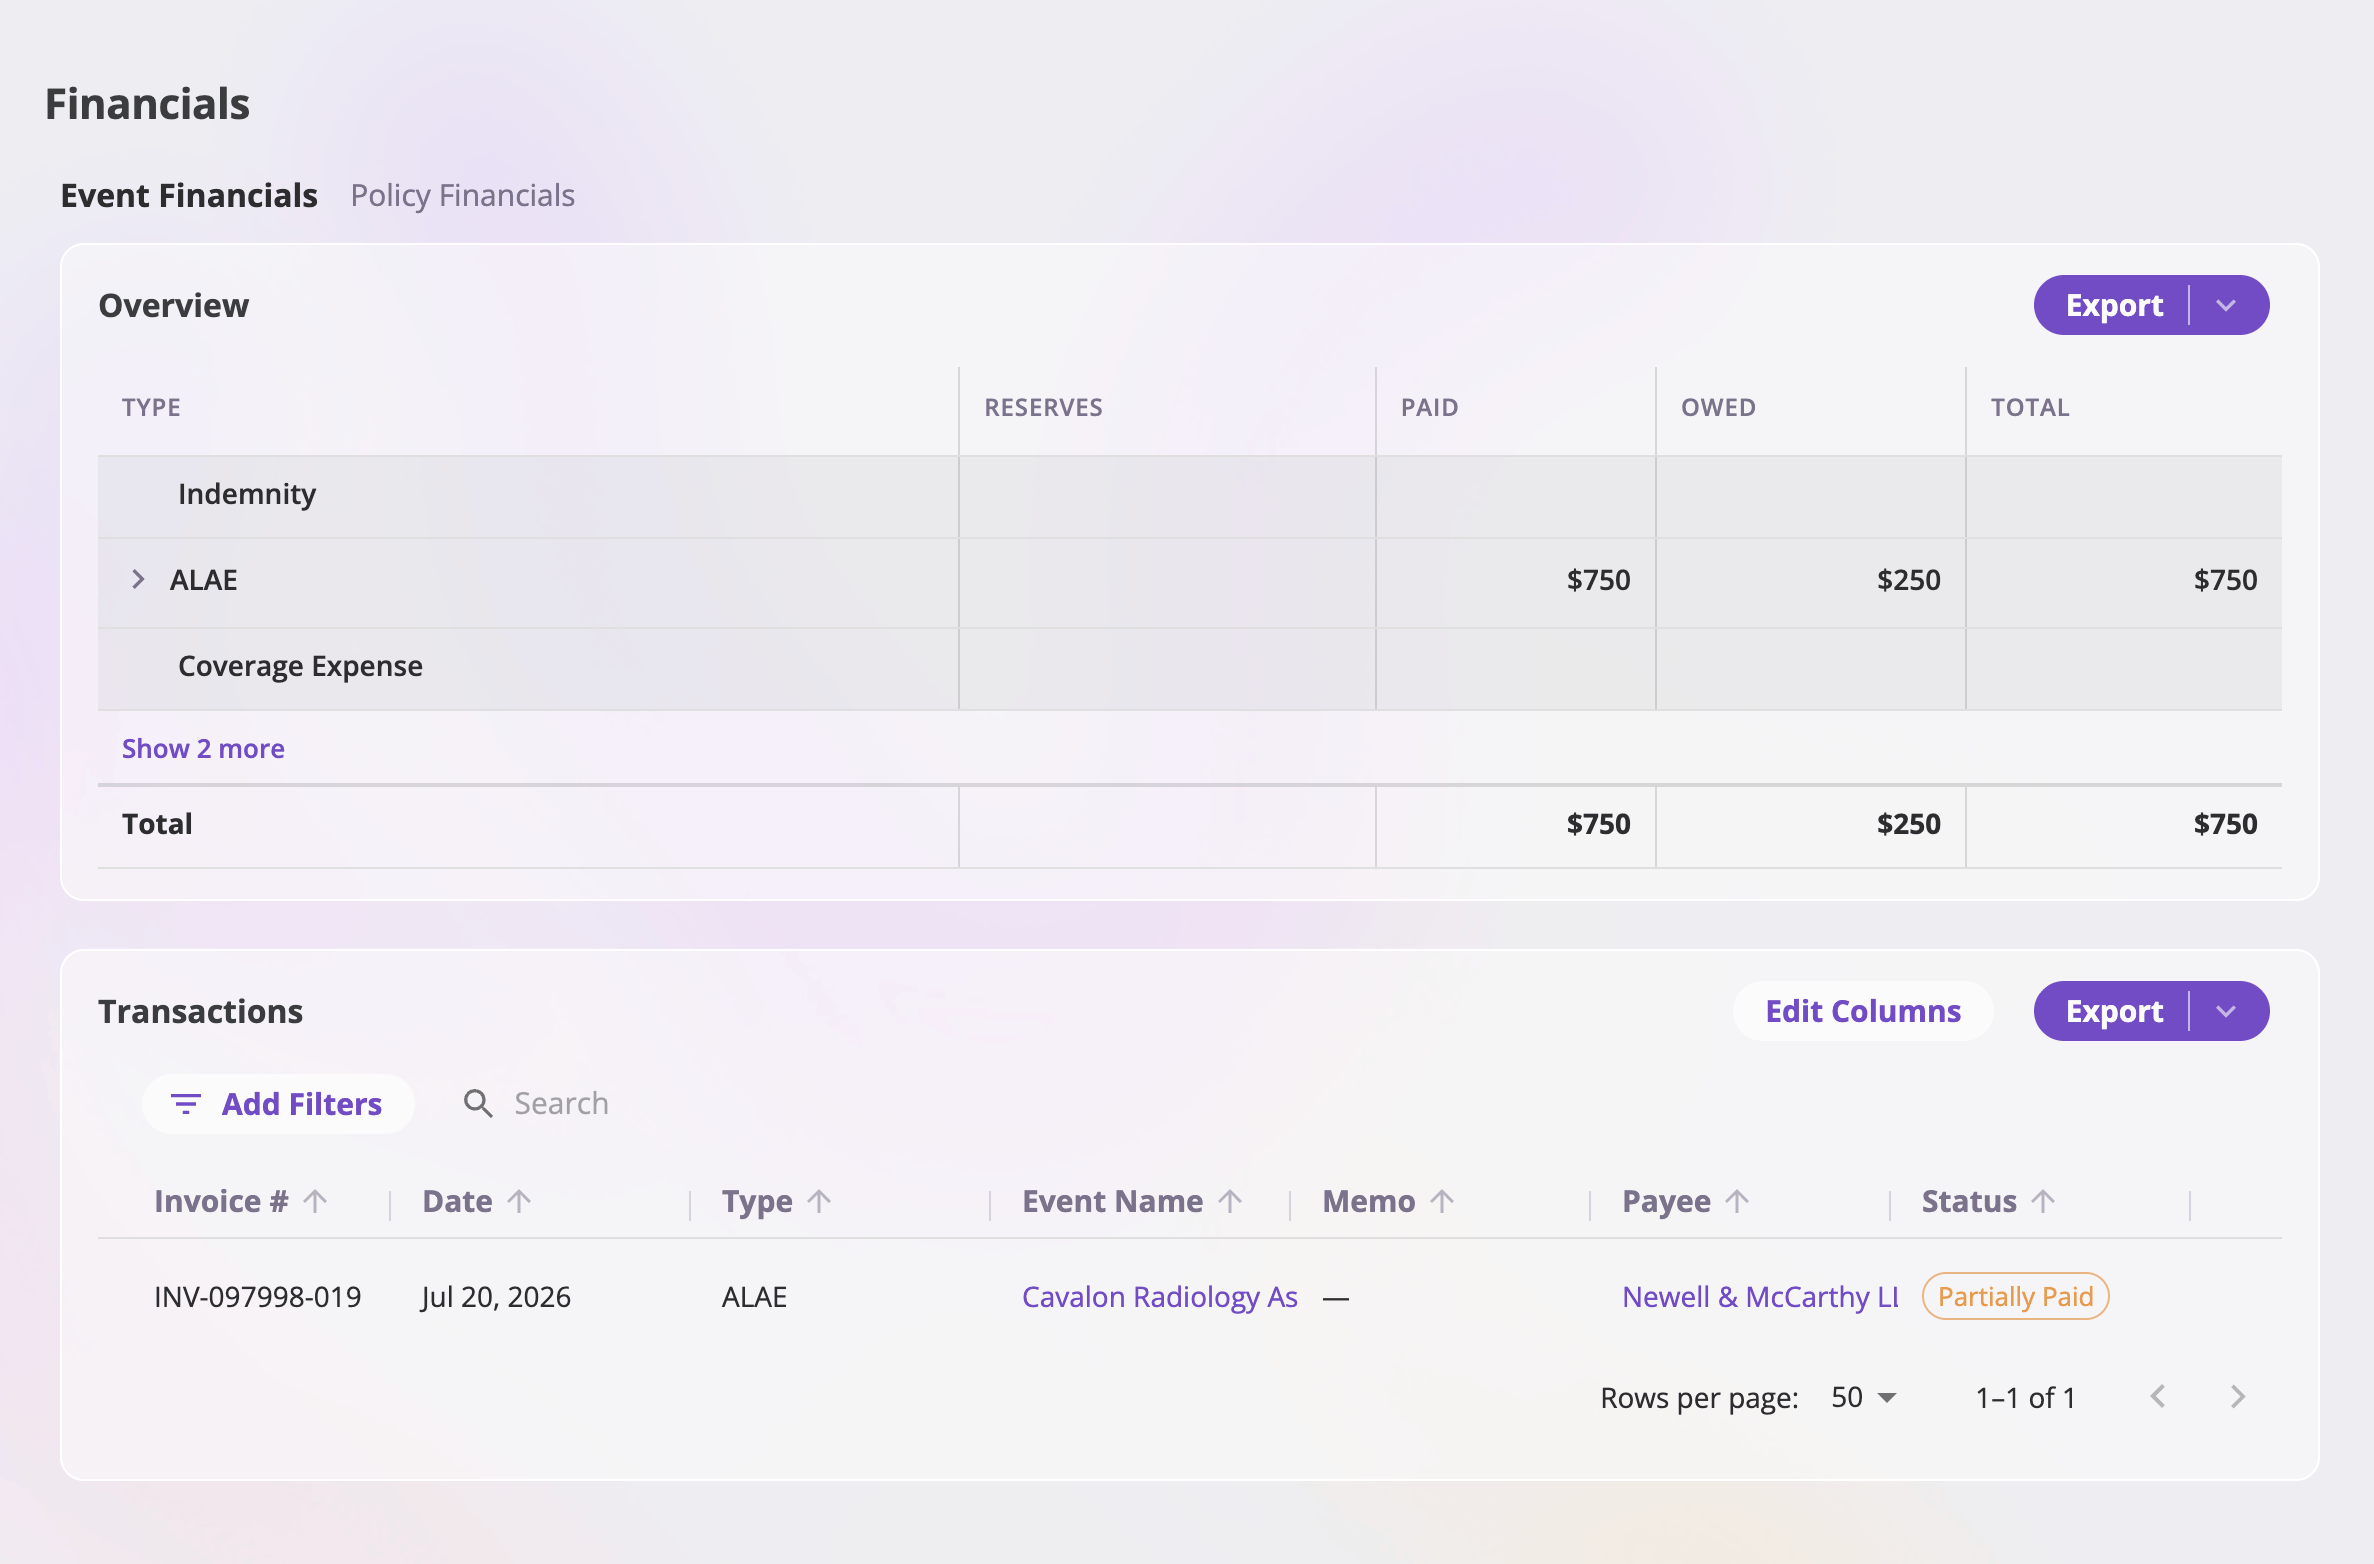
Financials → Event Financials — the company-wide Overview report above the invoice listing, with filters, search, and export.
- Filter by date, type, memo, payee, or event, and search free text.
- Sort the Date, Type, Memo, and Payee columns; the listing is paginated.
- Export the listing to Excel, CSV, or Google Drive with the export split button — exports respect your active filters and search.
Recording an event invoice
New invoices are recorded from an event’s Financials tab.1
Start from the event
On the event’s Financials tab, select Add New above the Transactions
listing and pick the invoice type. (With a single configured type the
button goes straight to it; with several it’s a dropdown.) Only types your
configuration allows to link to events are offered.
2
Fill in the New Transaction page
The invoice opens as a full-page form, pre-linked to the launching event.
The left pane takes attachments — drop or pick the source PDFs or
images (the invoice you were sent, receipts) so the document is readable
while you key in its data. The right side is the form itself.
3
Enter the details
- Type — changeable here, though switching discards entered line items (a confirmation guards it).
- Status — Owed (default) or Paid. Choosing Paid asks for a Paid Date and records the invoice as settled in full on save. The Paid option is available only when your configuration has a payment method set up to post paid invoices.
- Payee — who the invoice is paid to: any person or organization in your Directory, creatable inline.
- Invoice Date (defaults to today) and an optional Due Date.
- Memo — a free-text description.
- Line items — one row per component, each with its type and an explicit income or expense amount.
4
Create
Create saves the invoice and returns you to the event’s Financials
tab, where it appears in the Transactions listing and rolls into the
event’s report. At least one line item and an invoice date are required;
Cancel abandons the draft.
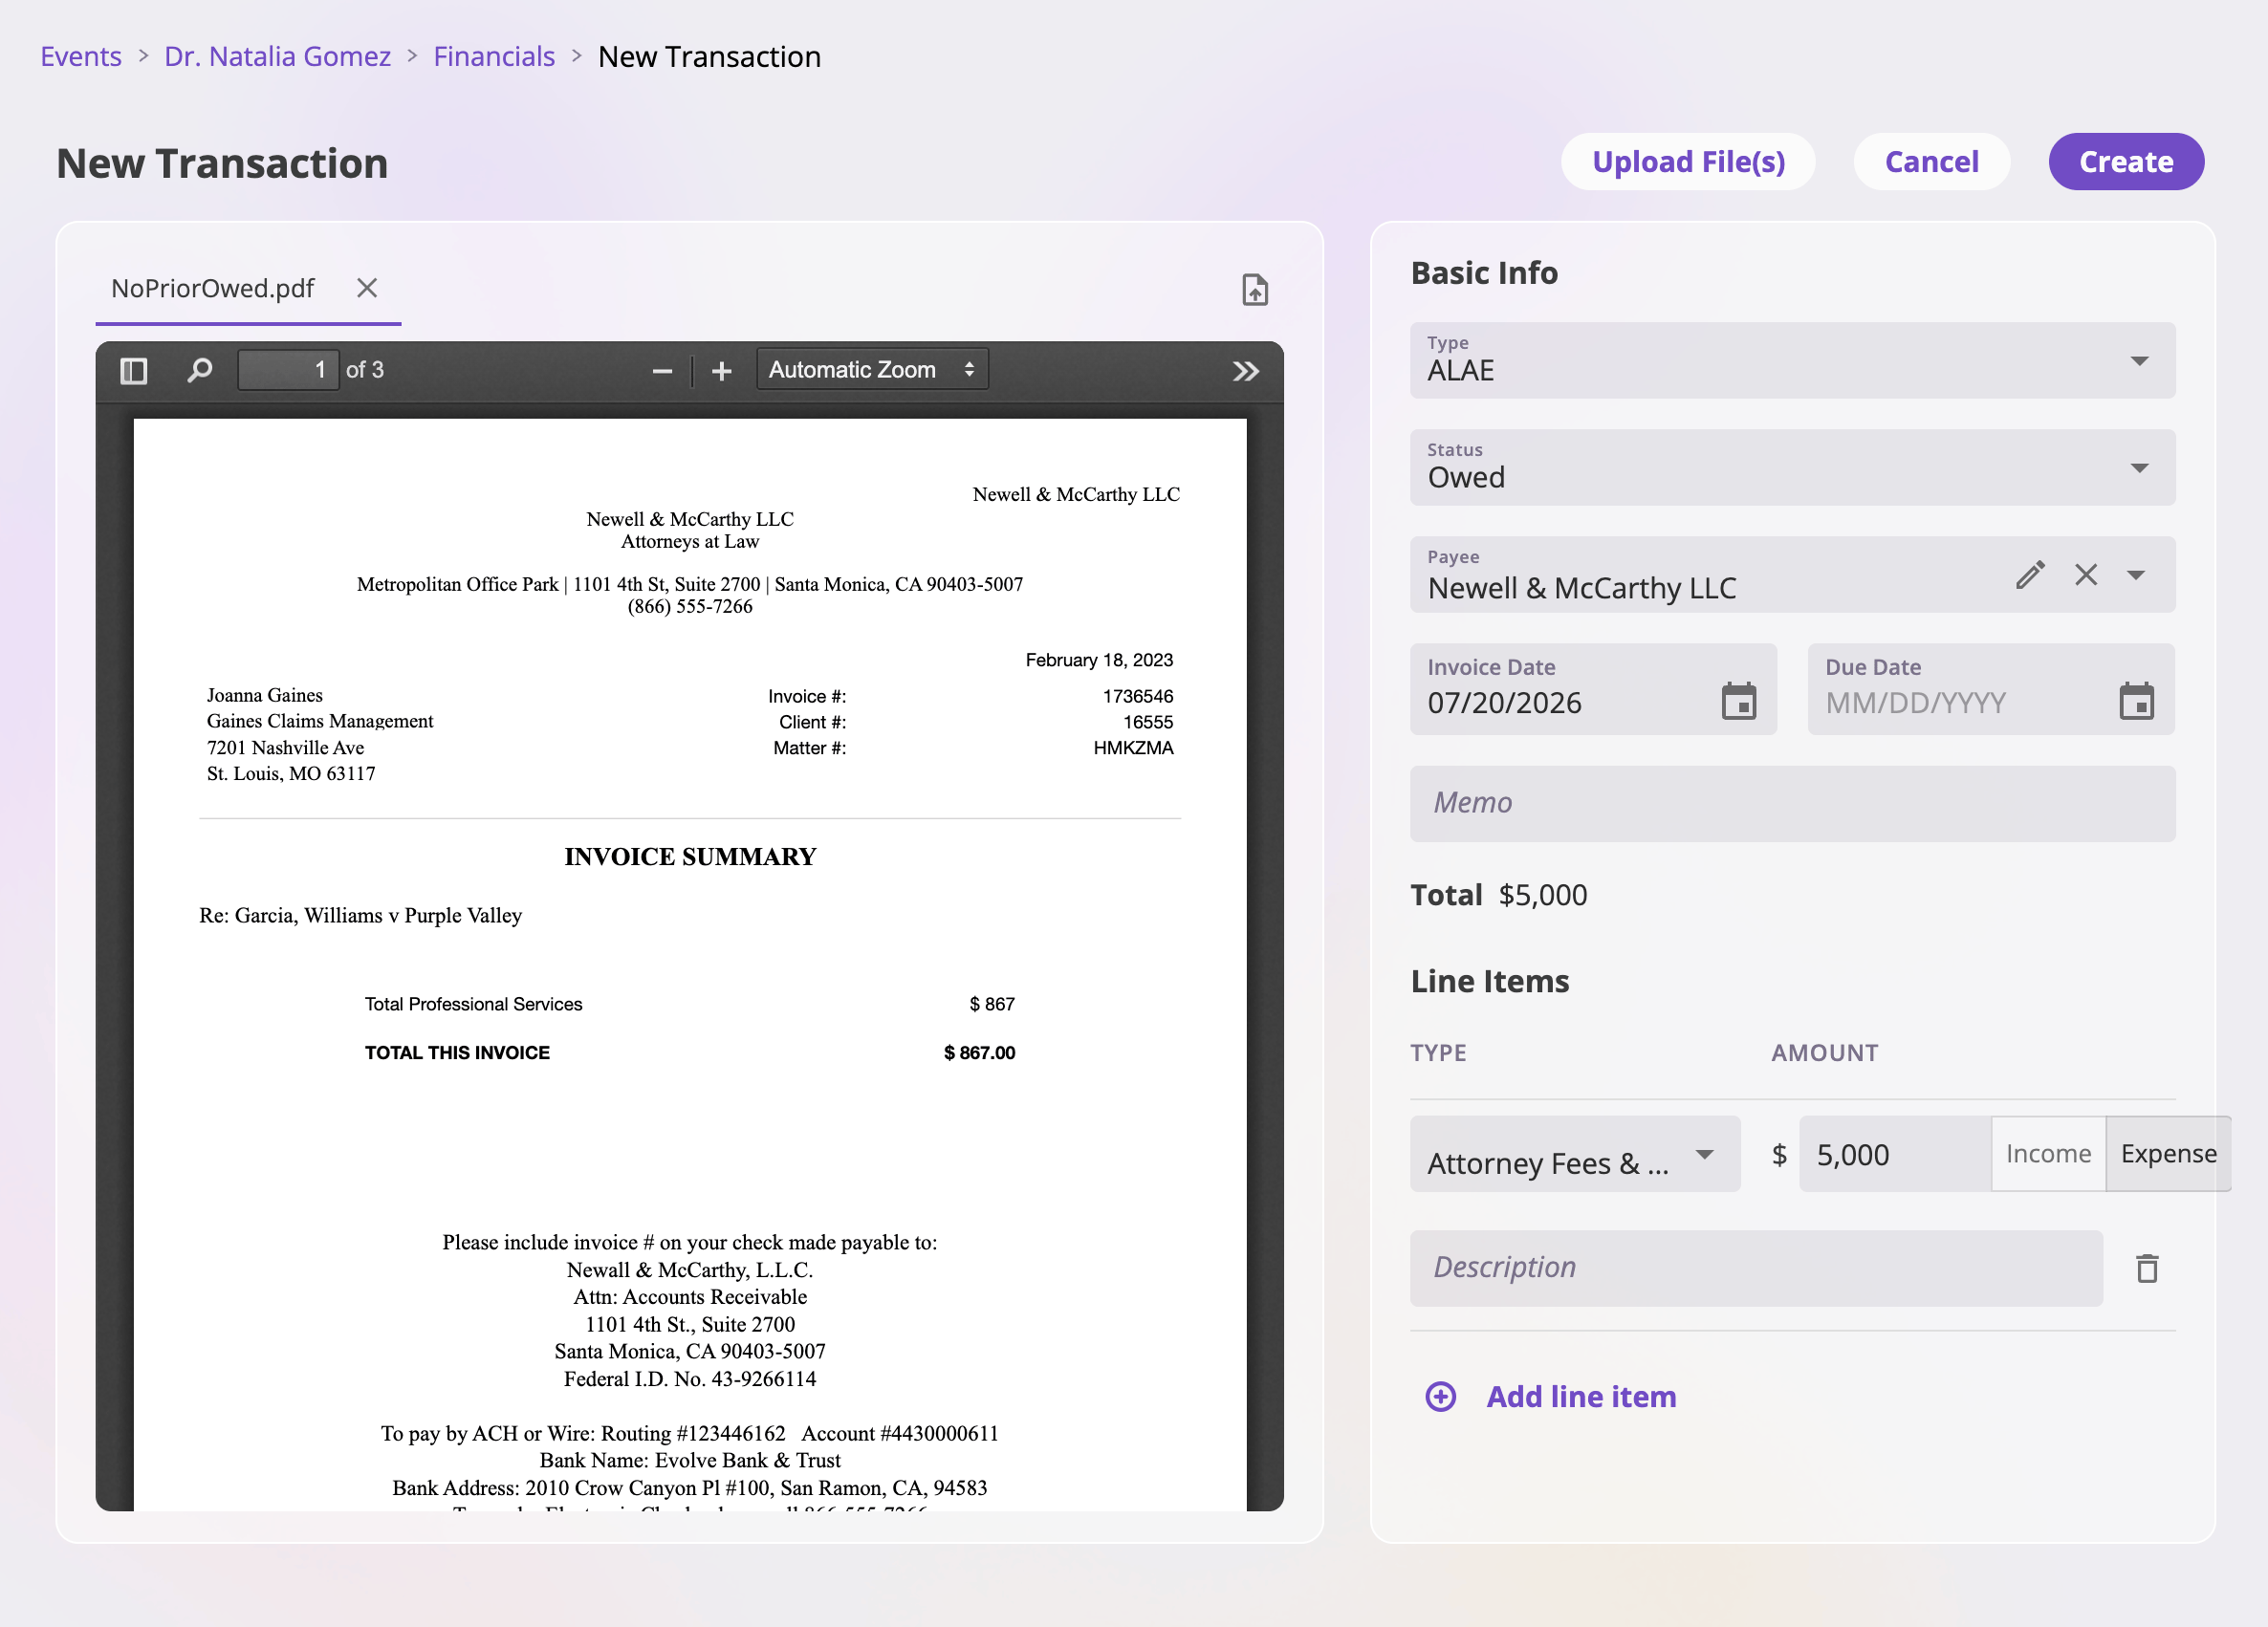
The New Transaction page — attachments on the left, the invoice form on the right, Create and Cancel in the header.
Configuring policy billing
A policy’s rated invoice target says what is owed and to whom. Its invoice plan says when and how that target will be invoiced. You can prepare the plan on the quote’s Billing step before bind, or manage it later from the bound policy.1
Open the policy's Financials tab
Open the policy and select Financials. Review Balances, Earnings,
and Transactions in the Overview card, then the policy’s invoice list
beneath it.
2
Open Configure Billing
Select Configure Billing to open the Policy Invoices drawer. This
action appears when policy invoicing is enabled for your company and your
role can update financials.
3
Build or adjust the plan
Set the Invoice generation settings and select Generate Invoices to
build a schedule. Generating replaces the invoices this change has added or
edited, so it asks you to confirm before discarding that work. You can also use
Add Invoice and edit invoices by hand, here and in the quote wizard.
Invoice Target keeps the current target beside the invoiced amounts so that
premiums, taxes, fees, and other configured lines can be accounted for. Review
each invoice’s payee, dates, and line items before saving.
4
Save the changes
Select Save invoice changes. The plan is validated and applied as one
change; if it cannot be applied, the existing invoices remain unchanged and
the drawer explains what needs attention.
Invoice statuses
An invoice’s status is derived from its payments — you don’t set it directly (beyond the create-time Owed/Paid choice above):Getting paid — recording payments
Clicking an invoice row from an event, policy, or company-wide listing opens its Update Transaction view — the place an existing invoice is updated. What the invoice is (type, line items, payee) is read-only here; the view is about how it gets settled. Each line item row shows its Amount, what’s been Paid, and what’s Outstanding.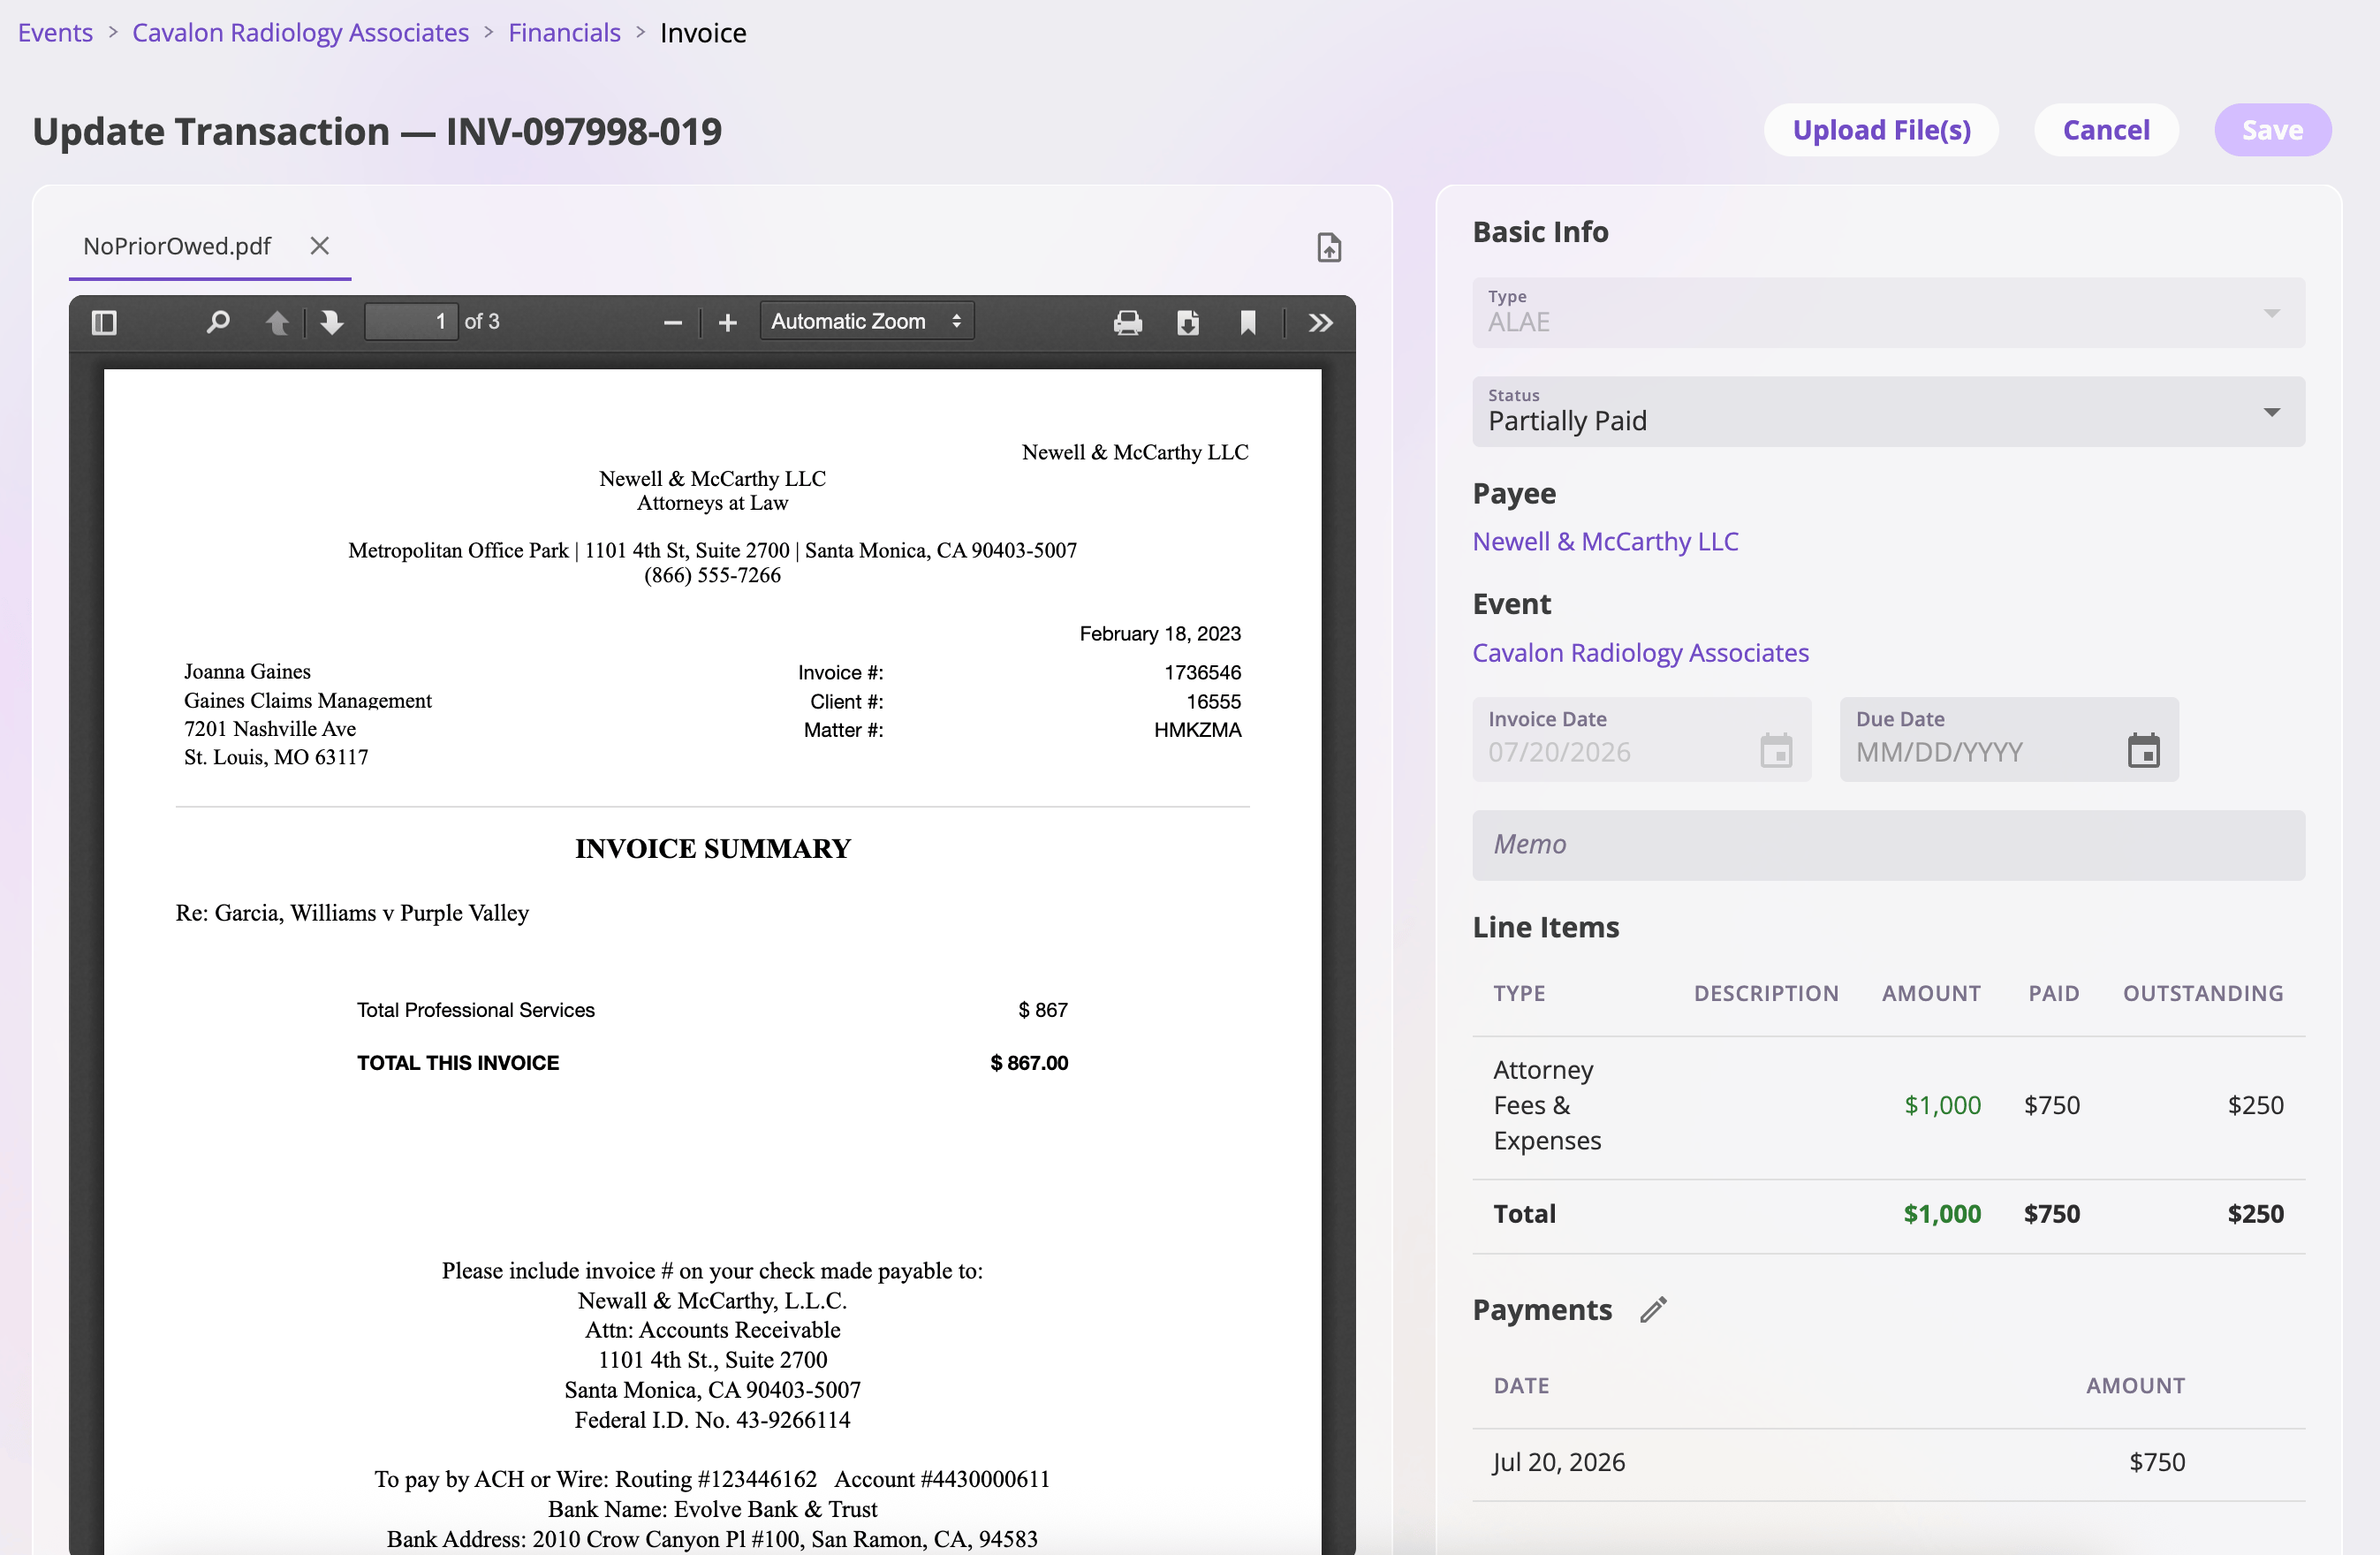
The Update Transaction view — line items with paid and outstanding amounts, and the payment actions along the bottom.
The Due Date is the one invoice attribute editable here — click the pencil
next to it; picking a date saves immediately.
Voided invoices
Voiding is reversible. A voided invoice’s row opens a read-only view whose single action is Restore, which brings the invoice (and its amounts) back to life.Bulk status changes
On an event’s Financials tab, the Transactions listing supports multi-select: check several invoices and use the Mark As dropdown (Paid / Owed / Void) to transition them together. A confirmation summarizes the change; invoices already in the target state are skipped, and if any fail they stay selected so you can retry exactly those.Where the money shows up
Every invoice and payment rolls up into:- The event’s Overview report — reserves, owed, paid, and total for that claim or incident. See Invoice types and line items.
- The policy’s Balances view — owed, paid, and total for invoices linked to that policy, alongside its separate pricing and earnings views.
- The company-wide Event or Policy Financials Overview — the corresponding scope aggregated across the company.
- The invoice listing exports — Excel, CSV, or Google Drive, with the listing’s filters applied.